Meta Business Verification
A Meta Business Manager account is a prerequisite for creating your WhatsApp Business API. However, having it verified is not necessary to start the process but is a good idea if you want to experience better features while using WhatsApp Business API. Below is a table that shows the difference between the two:
UNVERIFIED | VERIFIED |
| Unlimited customer-initiated conversations (24-hour messaging window) | Currently available messaging limits (1K, 10K, 100K, unlimited unique customers/day) |
| Messaging limit of 250 unique customers in a rolling 24-hour period | |
| Can register up to two (2) phone numbers, which can both be assigned to 1 WABA or split between 2 WABAs. | Can register up to 20 numbers per verified Business Manager Account |
| Can apply to become an Official Business Account |
Verification Process
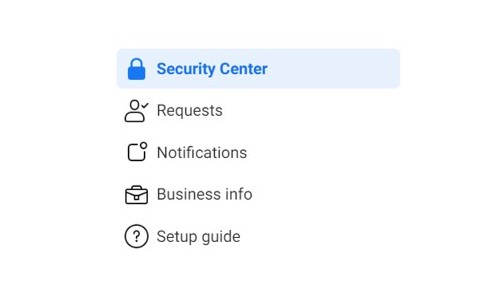
1. Log in to your Meta Business Suite → Settings (cog wheel icon) → Business Settings → Security Center. From there, you will see an option for Business Verification.
If you see the “Start Verification” button, please proceed to step 2. If not, kindly skip steps 2-5 and refer to the next topic below “What if you’re not eligible for Verification?”.
2. Provide your business details. This can include the following:
- Legal Business Name
- Business Address
- Phone Number
- Website
NOTE: Make sure the details you submit match the details of your legal business entity to refrain from any issues on the verification verdict.
3. Confirm your business details. Upload all the necessary docs that are mentioned on the screen. Due to jurisdictional legal document differences, Meta has provided a list of the specific documents which can be seen here.
4. Choose a contact method to confirm your connection. There are different methods for it such as email, phone, or domain verification. If you prefer domain verification and have not verified it before, you’ll need to do this first to know when to use domain verification to verify your business. Other options may also be required to confirm your connection via email or phone verification.
- Email: A confirmation code will be sent to your business’s email address. The domain of your email address needs to match the one for your website.
- Phone: You will receive a call with a confirmation code. You’ll need to upload a document, such as a utility bill, that confirms your business phone number.
- Text: You’ll get a confirmation code through text to your business’s phone number. You’ll need to upload a document, such as a utility bill, that confirms your business phone number.
5. Once finished, click Done.
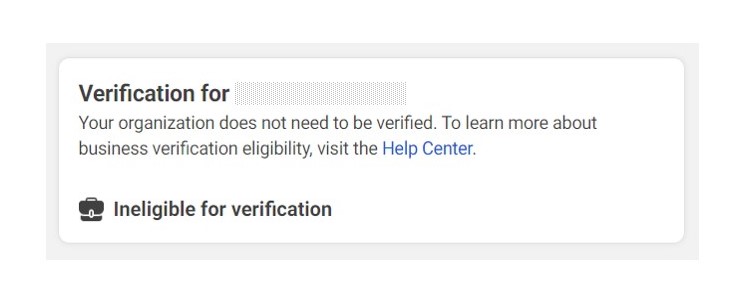
What if you’re not eligible for Verification?
There are some cases where it will say that you’re not eligible for verification.
To enable it, kindly:
- Fill out all of the information on the Business Info page, inside the Meta Business Manager settings
- Create a WhatsApp Business API account with 360dialog using the signup form
The WhatsApp Business API account will be placed under the “Limited Access” Tier and the “Start Verification” button will then be available. As soon as the verification process is completed, the account will be placed in the “Standard Access” Tier.
Verification Verdict
Meta may take several days to review your documents. You can check the current status of your verification by going to your Security Center. You’ll get a notification when the review is complete. If you receive confirmation that your business is verified, it will show something like this:
Filing an Appeal if The Verification is Rejected
There are various reasons why the verification request was rejected. This is because Meta considers a lot of factors during the business verification process. You would receive a notification email that would indicate what documents got rejected.
To learn more information about the rejection, you can go to Meta Business Manager → Security Center → You will have two options to either “Resubmit” or “Contact Facebook” under the rejected verification request.
Clicking “Contact Facebook” will route you to the “appeal” section where you will also get a ticket/ case number.
Clicking “Resubmit” on the other hand will route you to the verification section where you can re-upload the doc or anything that got rejected.
