Active Chats
Omnichannel Inbox via Active Chats
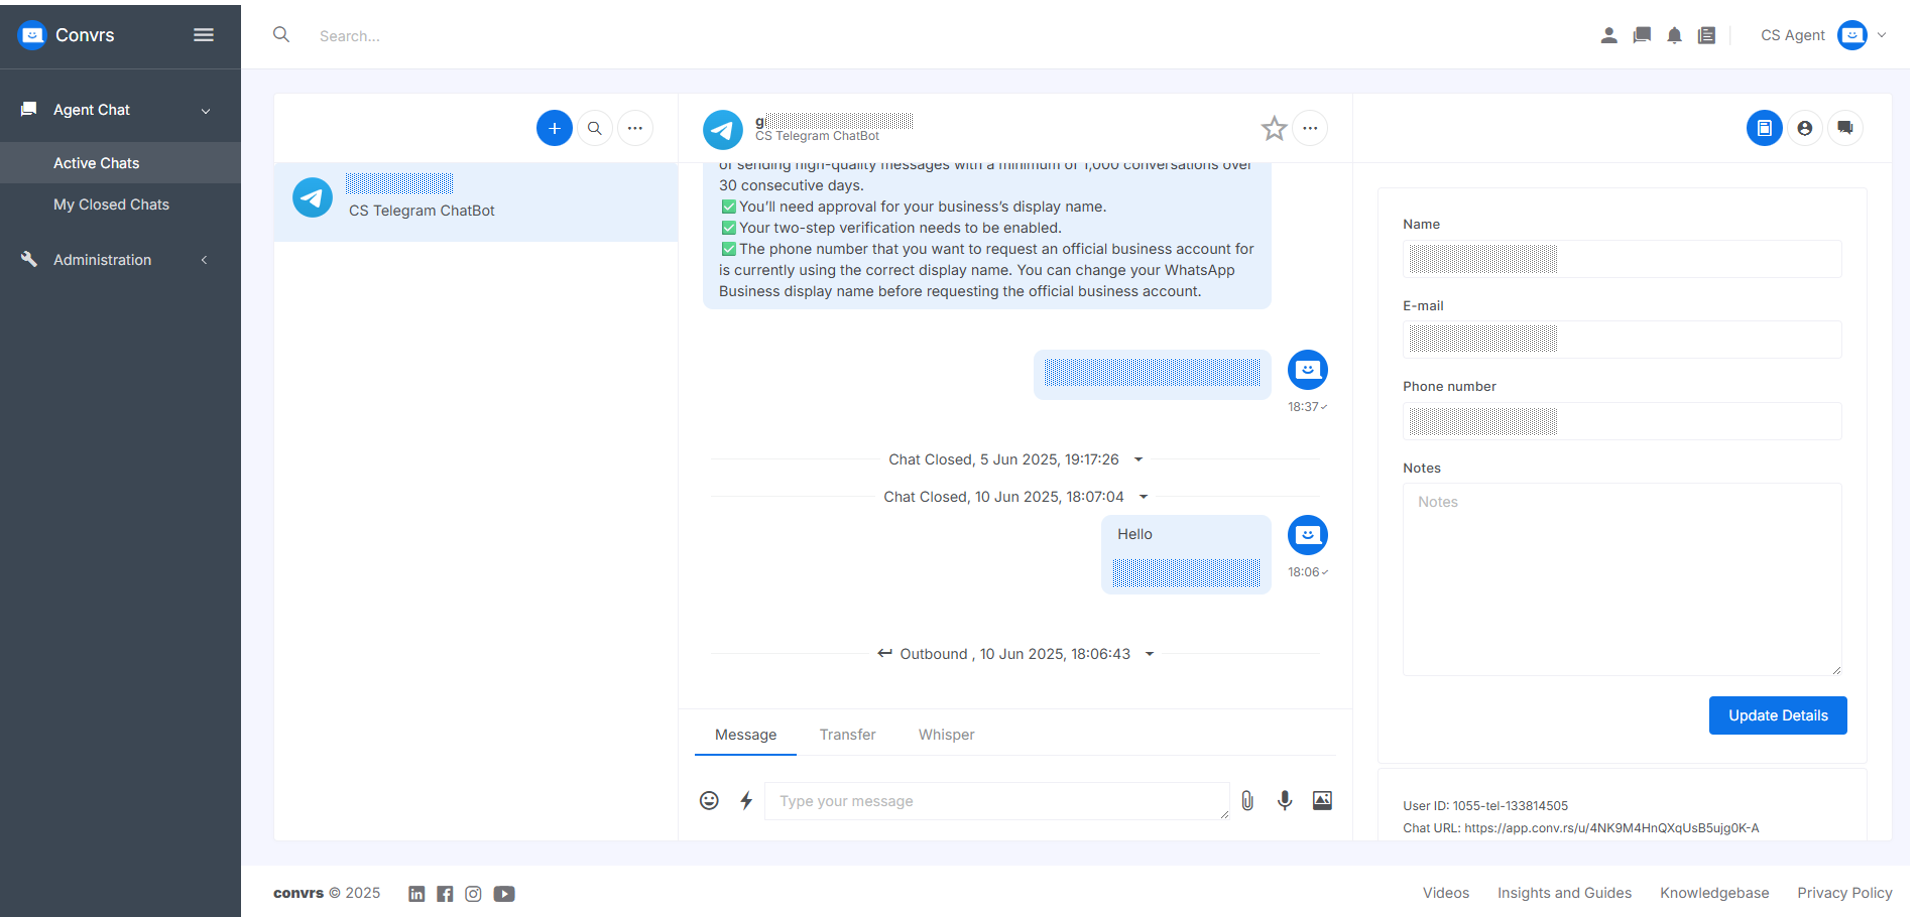
Everyone can access their inboxes by going to Agent Chat > Active Chats. All new and ongoing conversations from the channels you've opted for are available on this page.
There may be differences in the view if the agent has supervisory permissions enabled.
Agent Inbox
Inbox with Agent Supervise Permission Enabled

Roles with the Agent Supervise permission enabled can view all ongoing chats of the business unit assigned to them. Conversations assigned to them can be accessed on the External Chats tab. They are only able to whisper and transfer on the Supervise Agent tab.
Send New Outbound Messages
Only WhatsApp and SMS can send an outbound message first. All other channels require the user or customer to engage with the channel before an agent can reach out to them.
To send a new WhatsApp or SMS message, simply click on the blue circle with the + sign and choose the channel/number. Input the client's number and press New Chat.
If this is the first time you interact with a client, please read the do's and don'ts to minimize the likelihood of being marked as spam.
Send a New WhatsApp Business API Message
To send a new WhatsApp Business API message, click on the blue circle with the + sign and choose the channel/bot you're sending it from. Input the client's number and press New Chat.
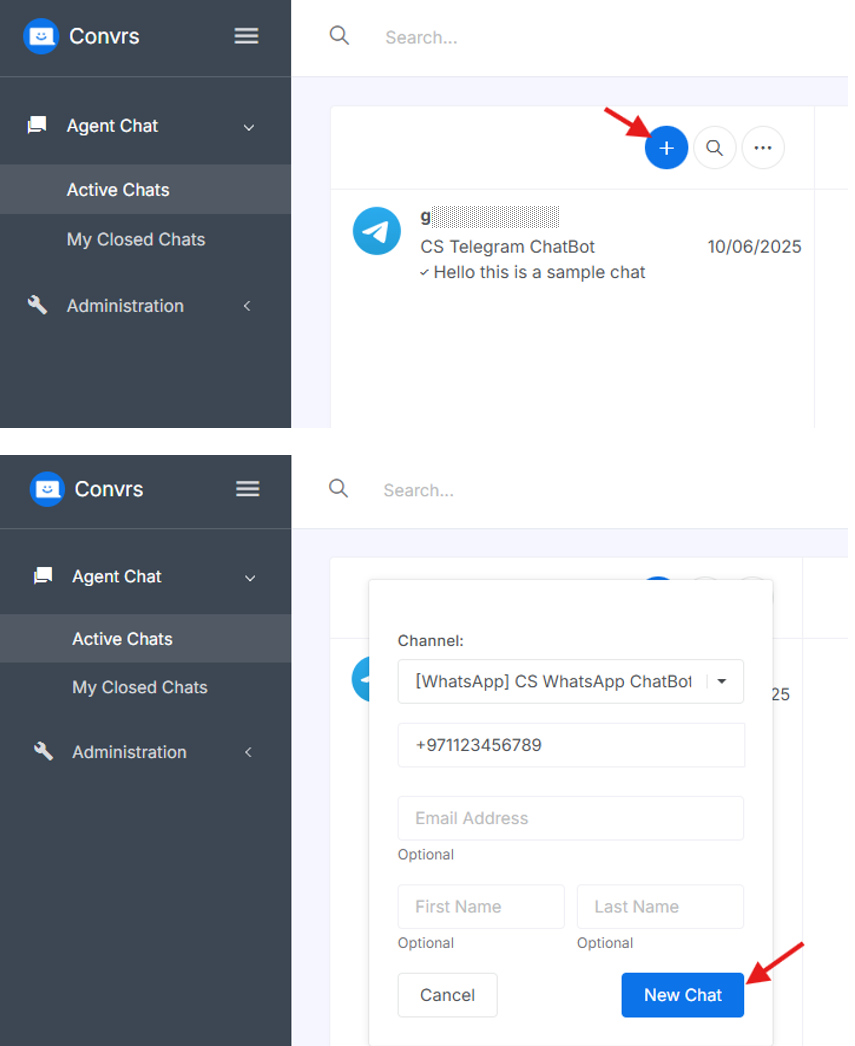
You need to send a template to open a new business-initiated message.
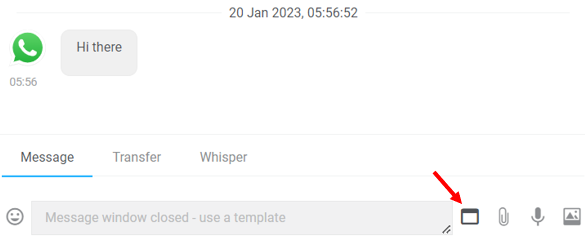
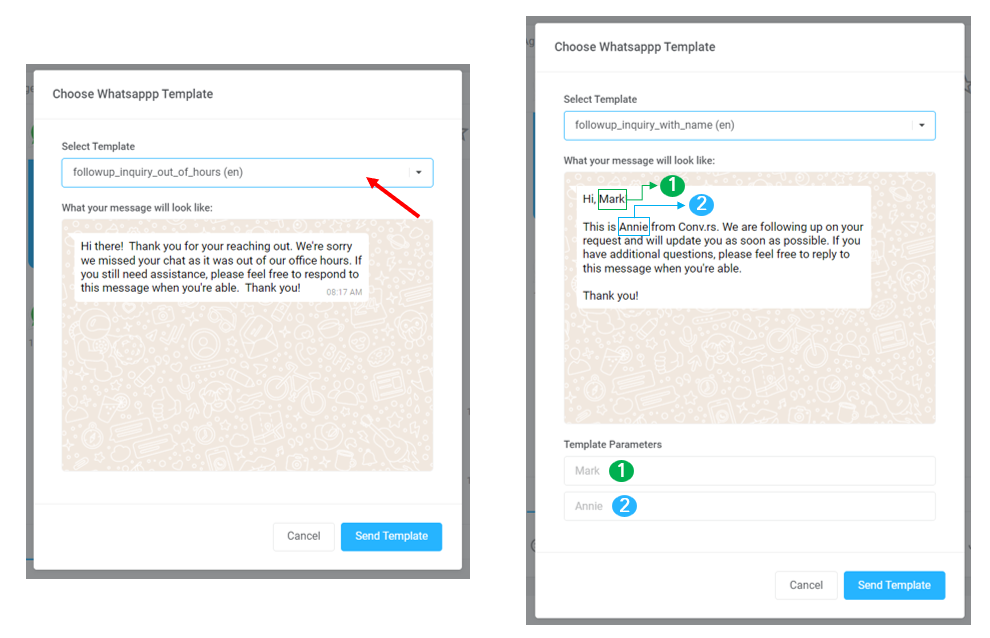
Click on the template icon to choose the appropriate template to send. If the template has variables, input the parameters in the fields provided before pressing the ‘Send Template’ button.
Once the client replies, you can send freeform messages until the 24-hour window is up.
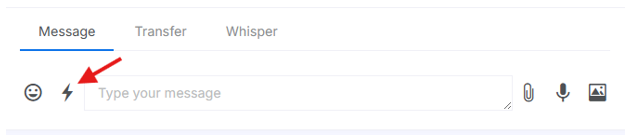
Using AI to Fix Spelling and Grammar, Tone
To help agents with their conversations, they can use AI to help with their spelling, grammar, and tone. Click on the lighting icon beside the text box and when done, press Use Text.
Supported File Types
Agents may ask users to upload documents to process their applications. While the files supported depend on the channel they’re using, most media and document formats (e.g., png, jpeg, gif, pdf, docx, xlsx, csv) are supported by Convrs. Limit photo and document files to 2MB at most, and up to 16MB for movie and audio files.
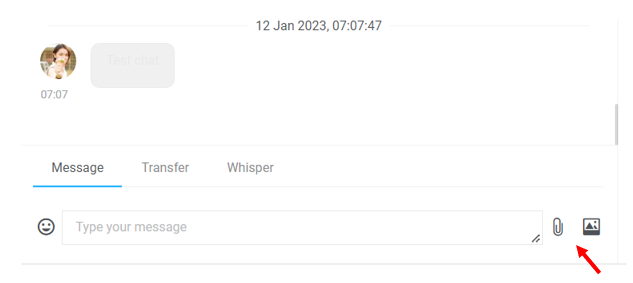
Uploading Files in Active Chat
Images/documents can be added via drag and drop, copy and paste, or clicking the available buttons.
Send Voice Notes via WhatsApp
In a WhatsApp chat, click on the microphone icon to record the voice note. Make sure to allow the browser to access the system's microphone when the agent first uses the voice note function.
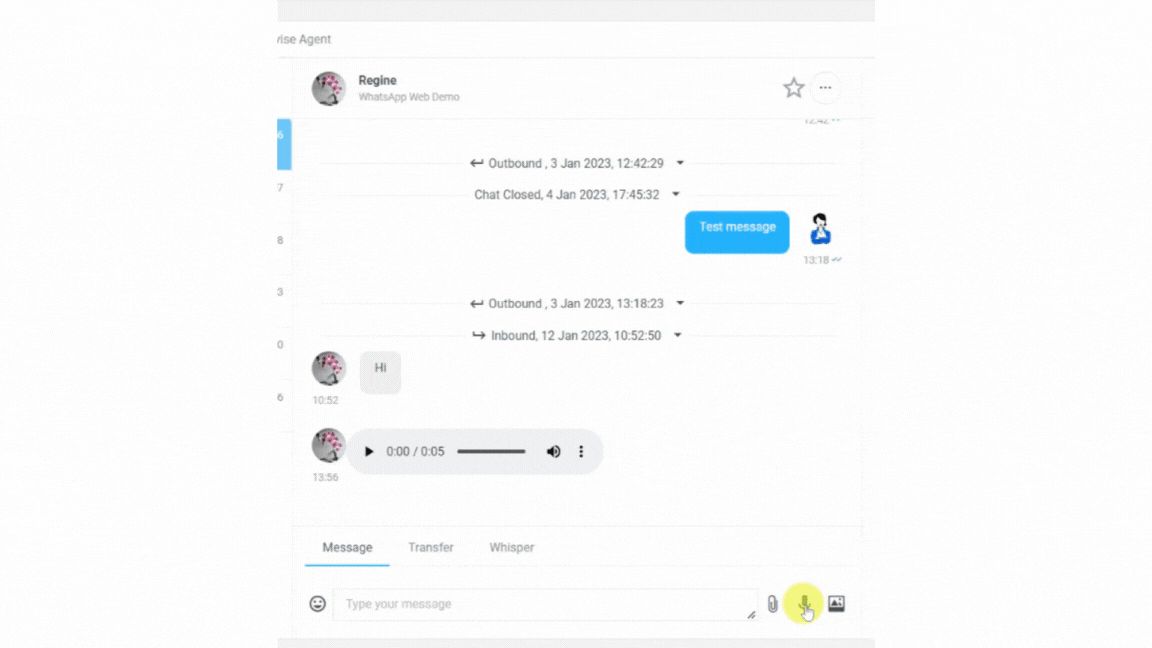
Once done, press the stop button and listen to the playback before hitting send.
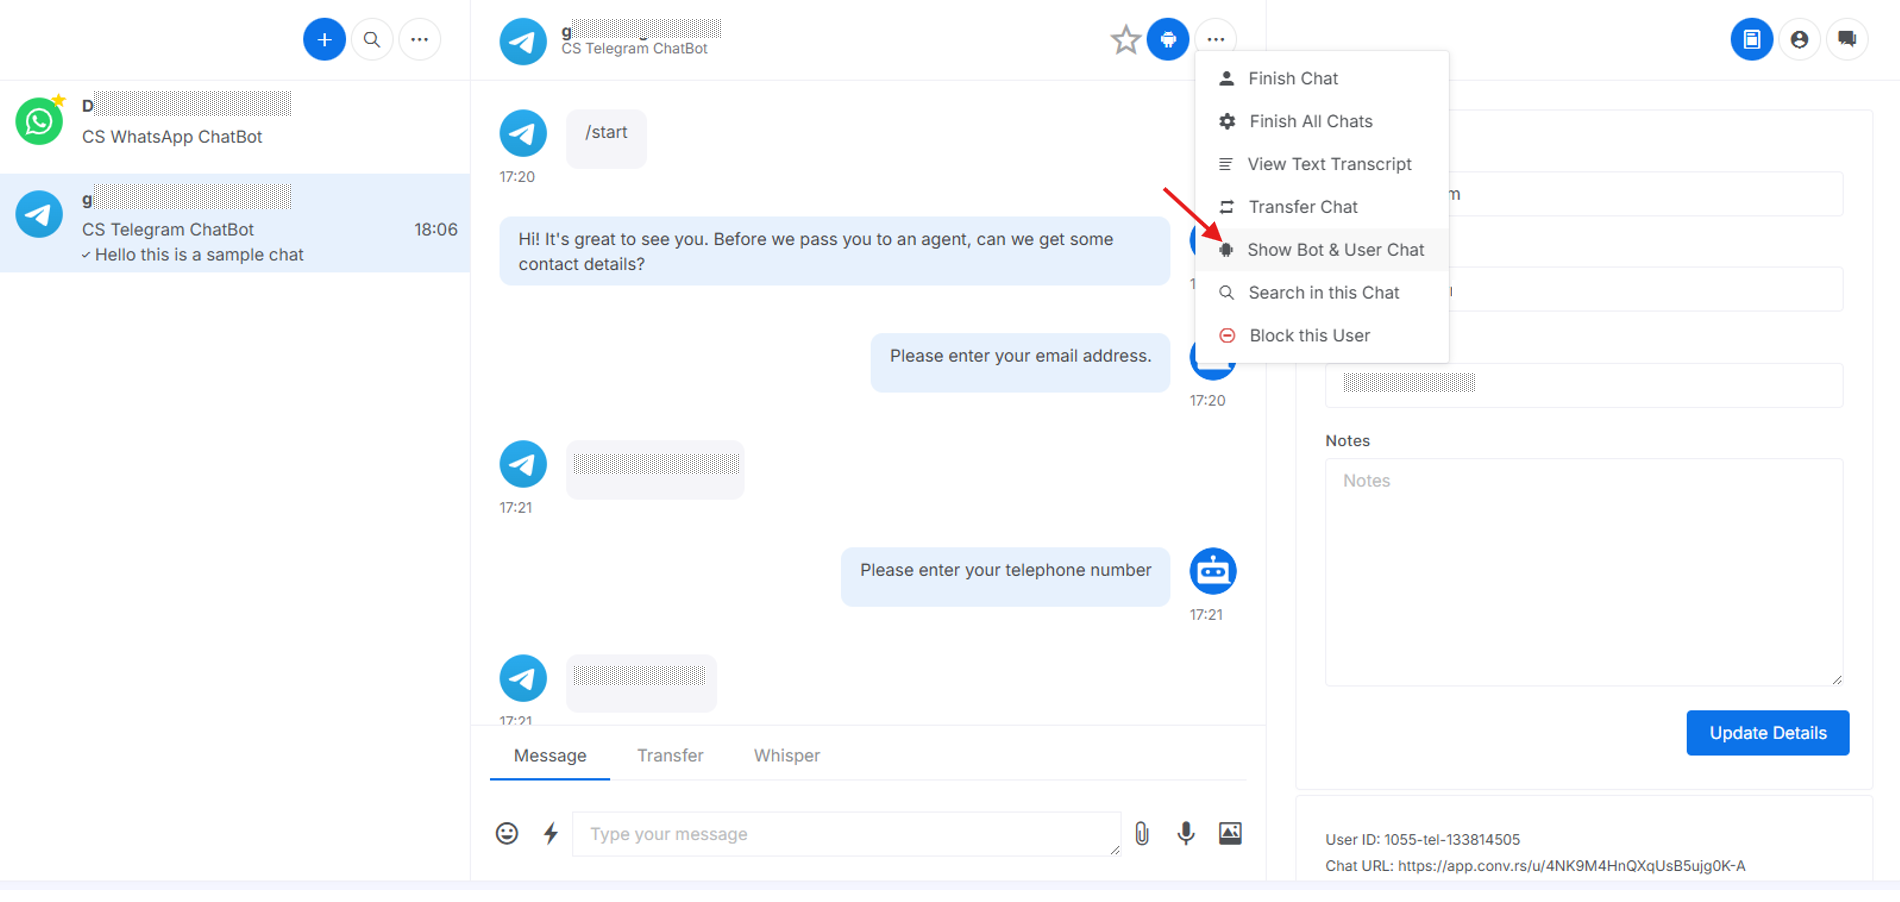
Show Bot & User Chat
When the chatbot has a flow running, the agent can check what the user has typed in or chosen by clicking on the Show Bot & User Chat option. This is helpful for gaining context in the inbound conversation as well.
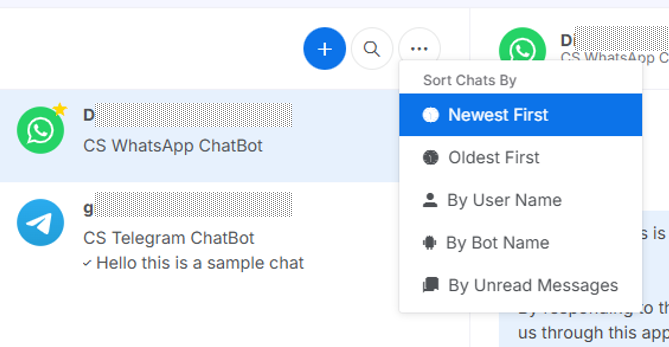
Organizing Active Chats
You can organize your assigned Active Chats by clicking on the dots to the right of the New Chats button and choosing an option.
Mark or Pin Important Chats
Press the star icon to mark important chats, which will pin the conversation to the top.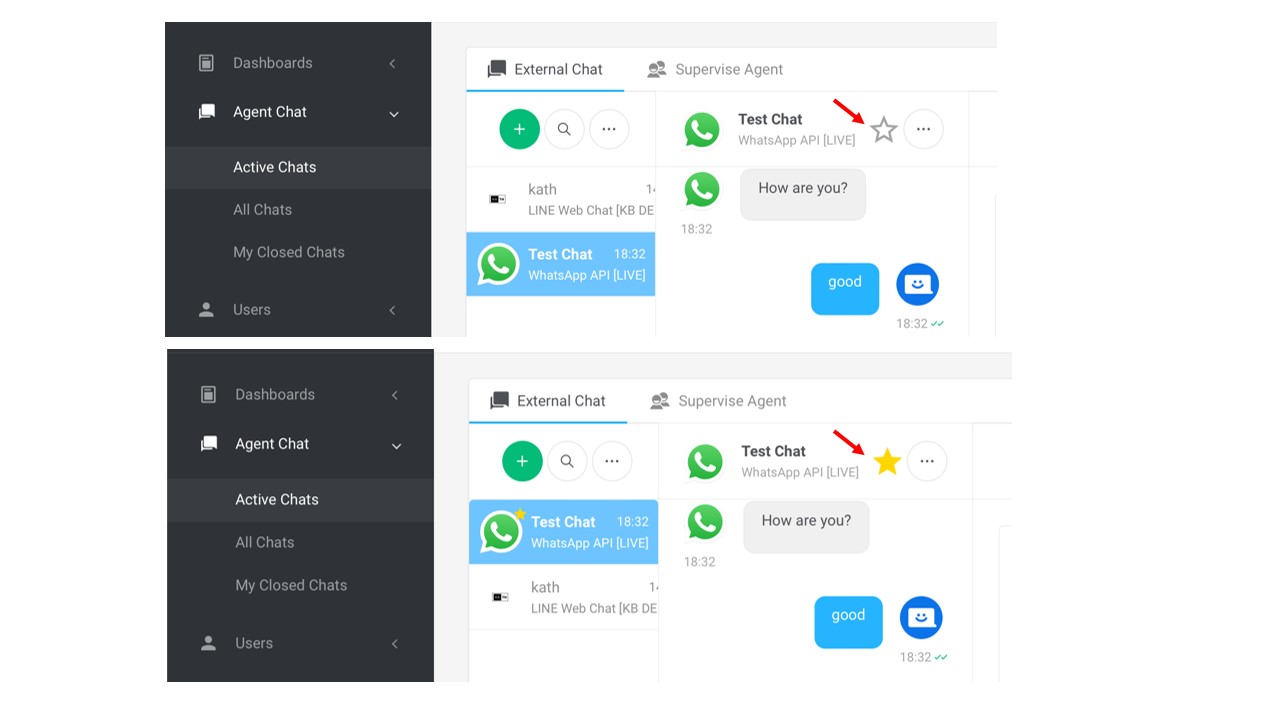
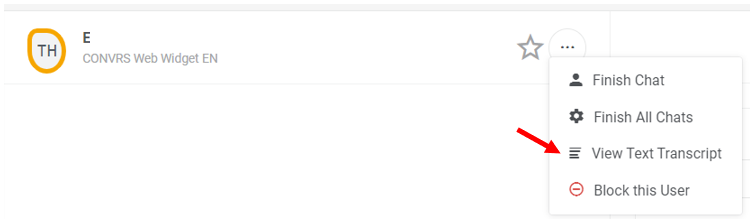
Download a Chat Transcript
Transcripts are particularly useful for web chat, specifically if a client would like to ask for documentation. To do so, press the View Text Transcript option.
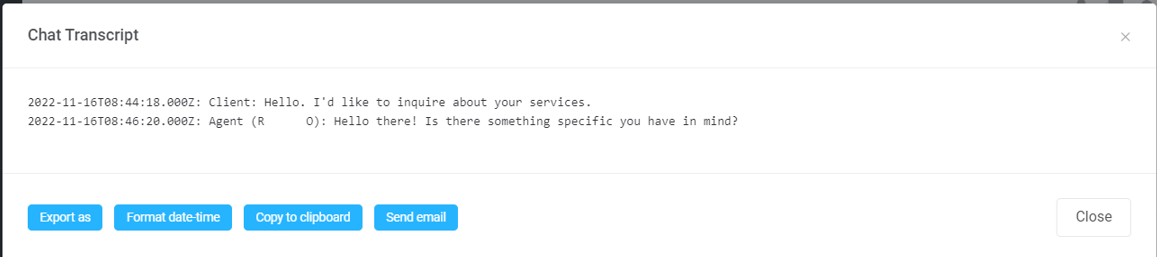
The chat transcript window will appear, and the agent can export, format the date-time, copy, or send it as an email. Please note that the time stamps follow the UTC timezone.
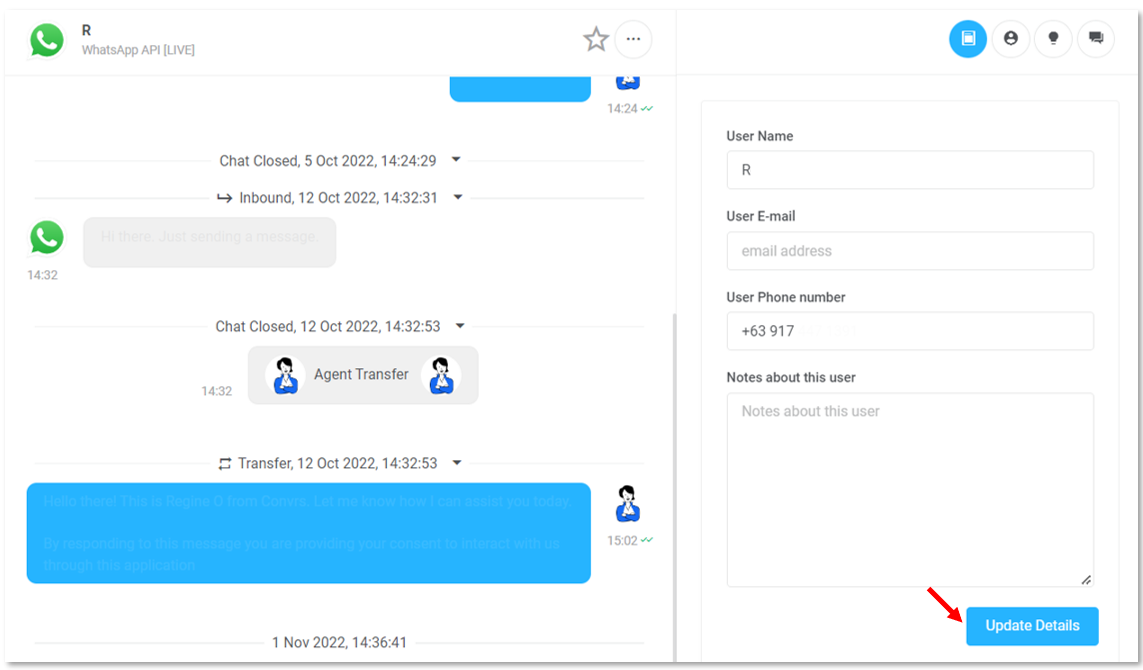
Update a Customer's Contact Details
You can edit their details on the right-hand side of the chat box. Update their name, email, and phone number; even include internal notes about them before pressing the Update Details button.
Access Saved Replies or Canned Messages
To access a canned or saved reply that can be used by everyone, agents must go to the right-hand side menu and click on the Standard Replies icon. On that menu, they will have access to all the saved replies.
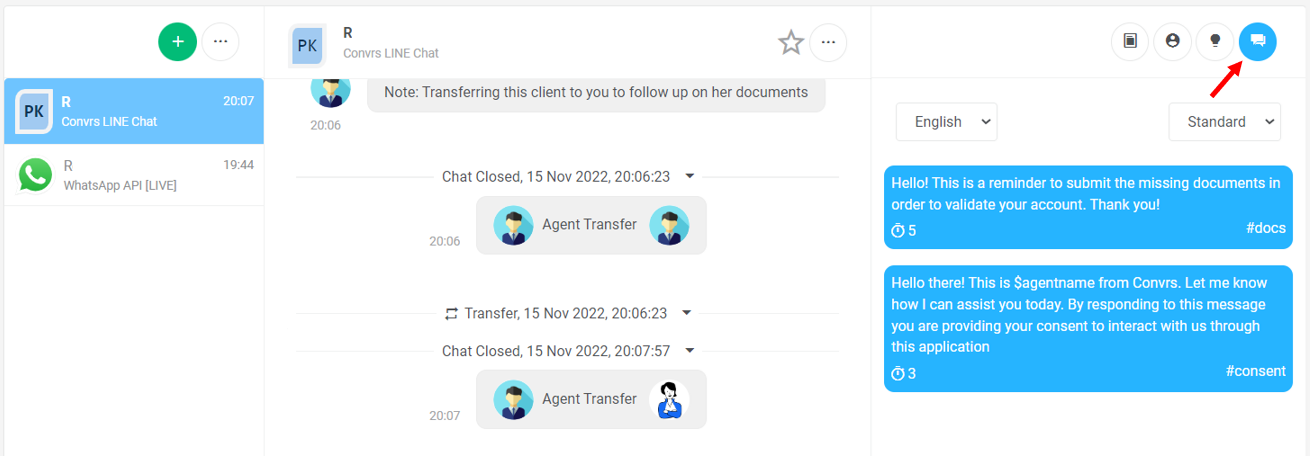
Alternatively, they can type the # symbol on the agent chat text box, and it should pull up all the available agent replies that they can send.

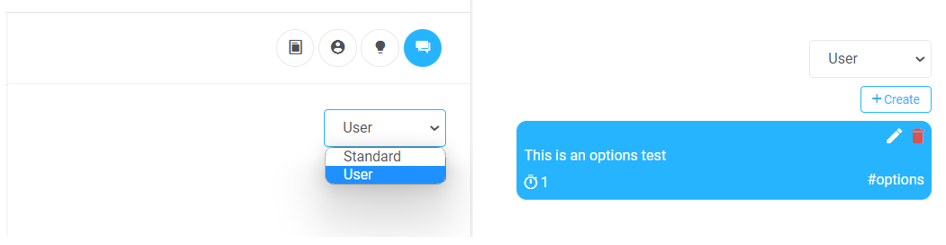
Create Individual Saved Replies or Canned Response
Agents can create their canned replies if the permission (Agent Chat Allow Own Reply) is applied to their role.
Press the Standard Replies icon on Actives Chat to create a new agent reply. Press on the dropdown menu and choose User. After which, press +Create. All fields are required to be populated. Add a hashtag as a reference for a quick reply function on the agent chat text box. There is no need to add the # sign before the text on the hashtag field.
Set how many seconds it will be before the message is sent through the Delay field. This function is available so that when you send multiple canned replies, there will be a delay in each message sent, making it feel more natural. Please note to set it to a minimum of 1 second.
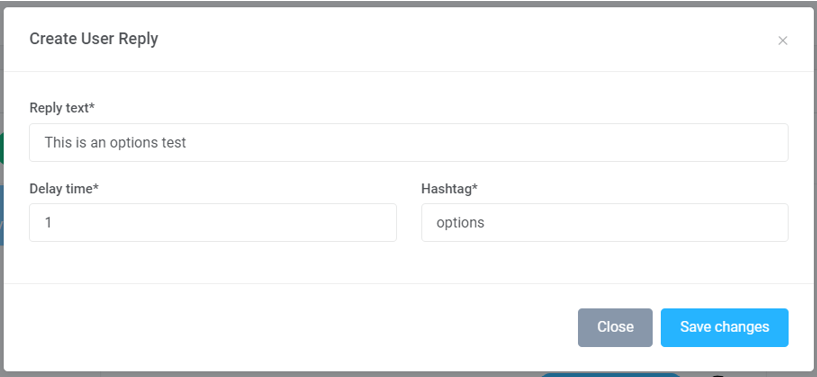
Once this is saved, the reply will be made available by using the # on the text box or through the Standard Replies button on the right-hand side of the page.
Transfer an Active Chat
When necessary, an agent may transfer a chat to a colleague. To do so, press the ‘Transfer’ module on the Active Chats inbox, and click on the people icon indicated by the green arrow. You may also add a private note to the next agent before transferring the conversation to them.
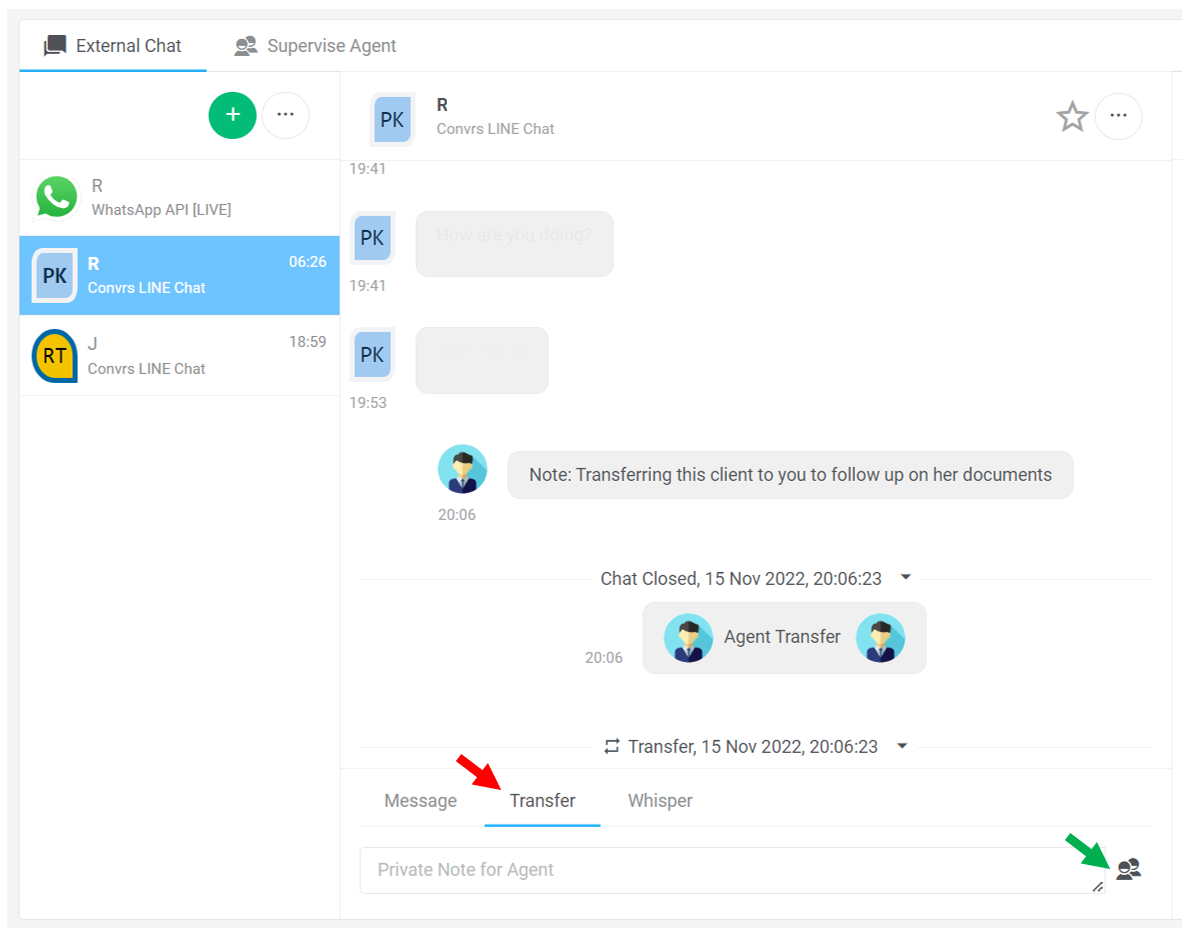
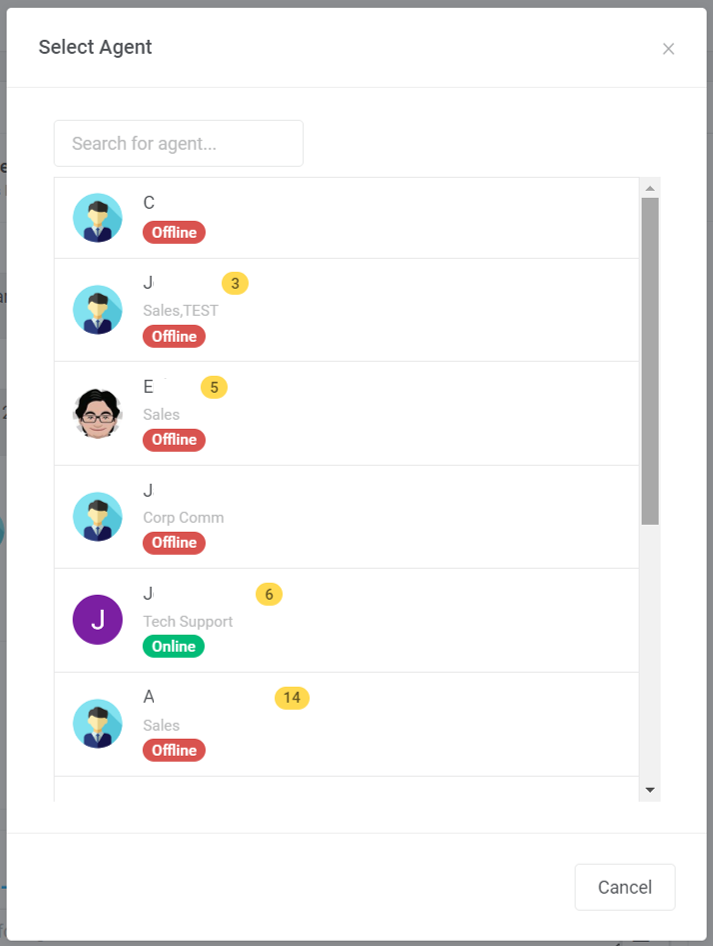
The ‘Select Agent’ screen will pop up. Choose the agent you wish the chat to be transferred to. Even if they are offline, the chat will be transferred to them, and they will be able to pick it up once they log in to their Convrs dashboard.
The transfer function is also available on the Agent Supervise screen. If you can access this screen, you may transfer conversations from one agent to another independently.
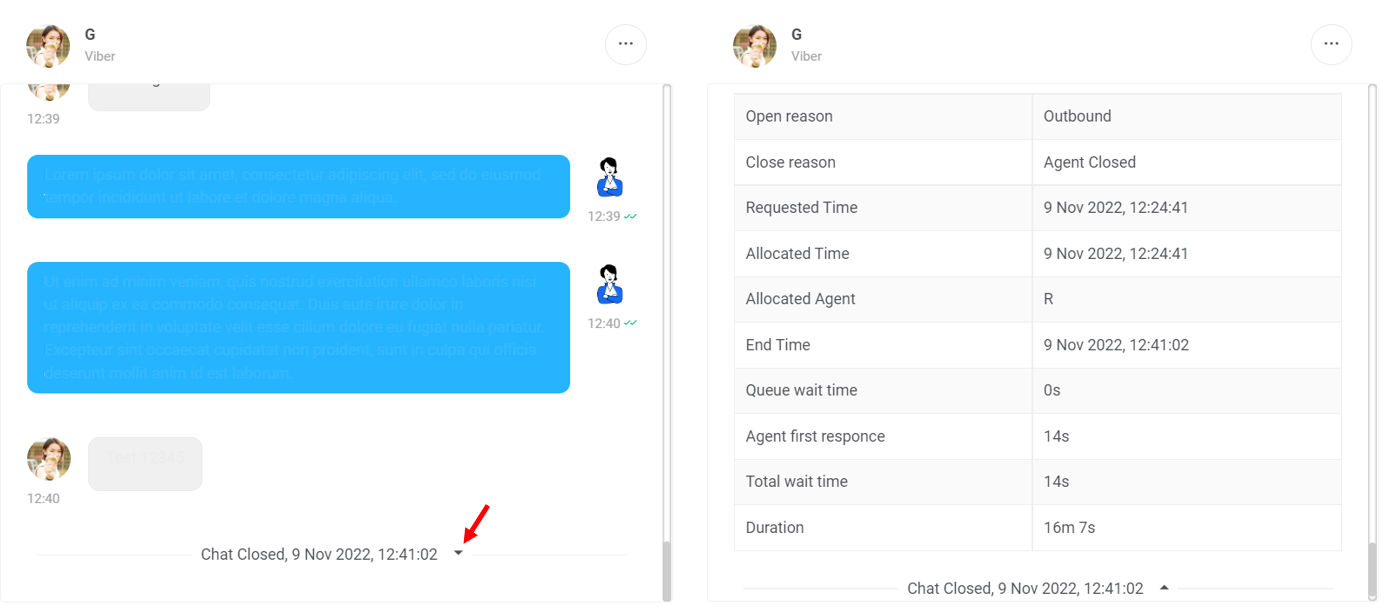
Active Chats Initial Data Points
Every time a new chat arrives, is closed, or is transferred, a line break will appear on the chat window indicating Inbound, Transfer, or Chat Closed, along with the date and the agent's local time. A table with initial details is shown if you press the arrow icon.
The Requested Time is the time the user needs to be allocated to an agent. In contrast, the Allocated Time is the time that the user was allocated to an agent.
This could be the same time, or there might be a delay because the agent was offline, etc.
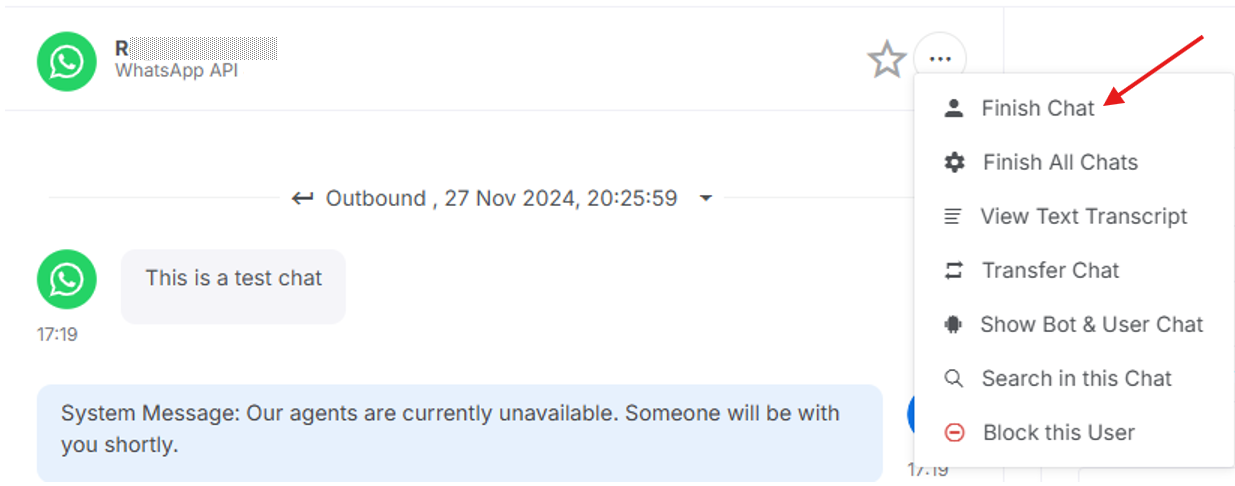
Finish a Chat
We recommend closing the chat when the agent has finished helping a customer. This clears the agent's active chats queue and logs the chats for the reports.
To close a chat, agents have to look for the three-dot menu at the center menu and press Finish Chat.
[RO161122V1]
[JC161122v1]
[RO200625v2]