Task Window
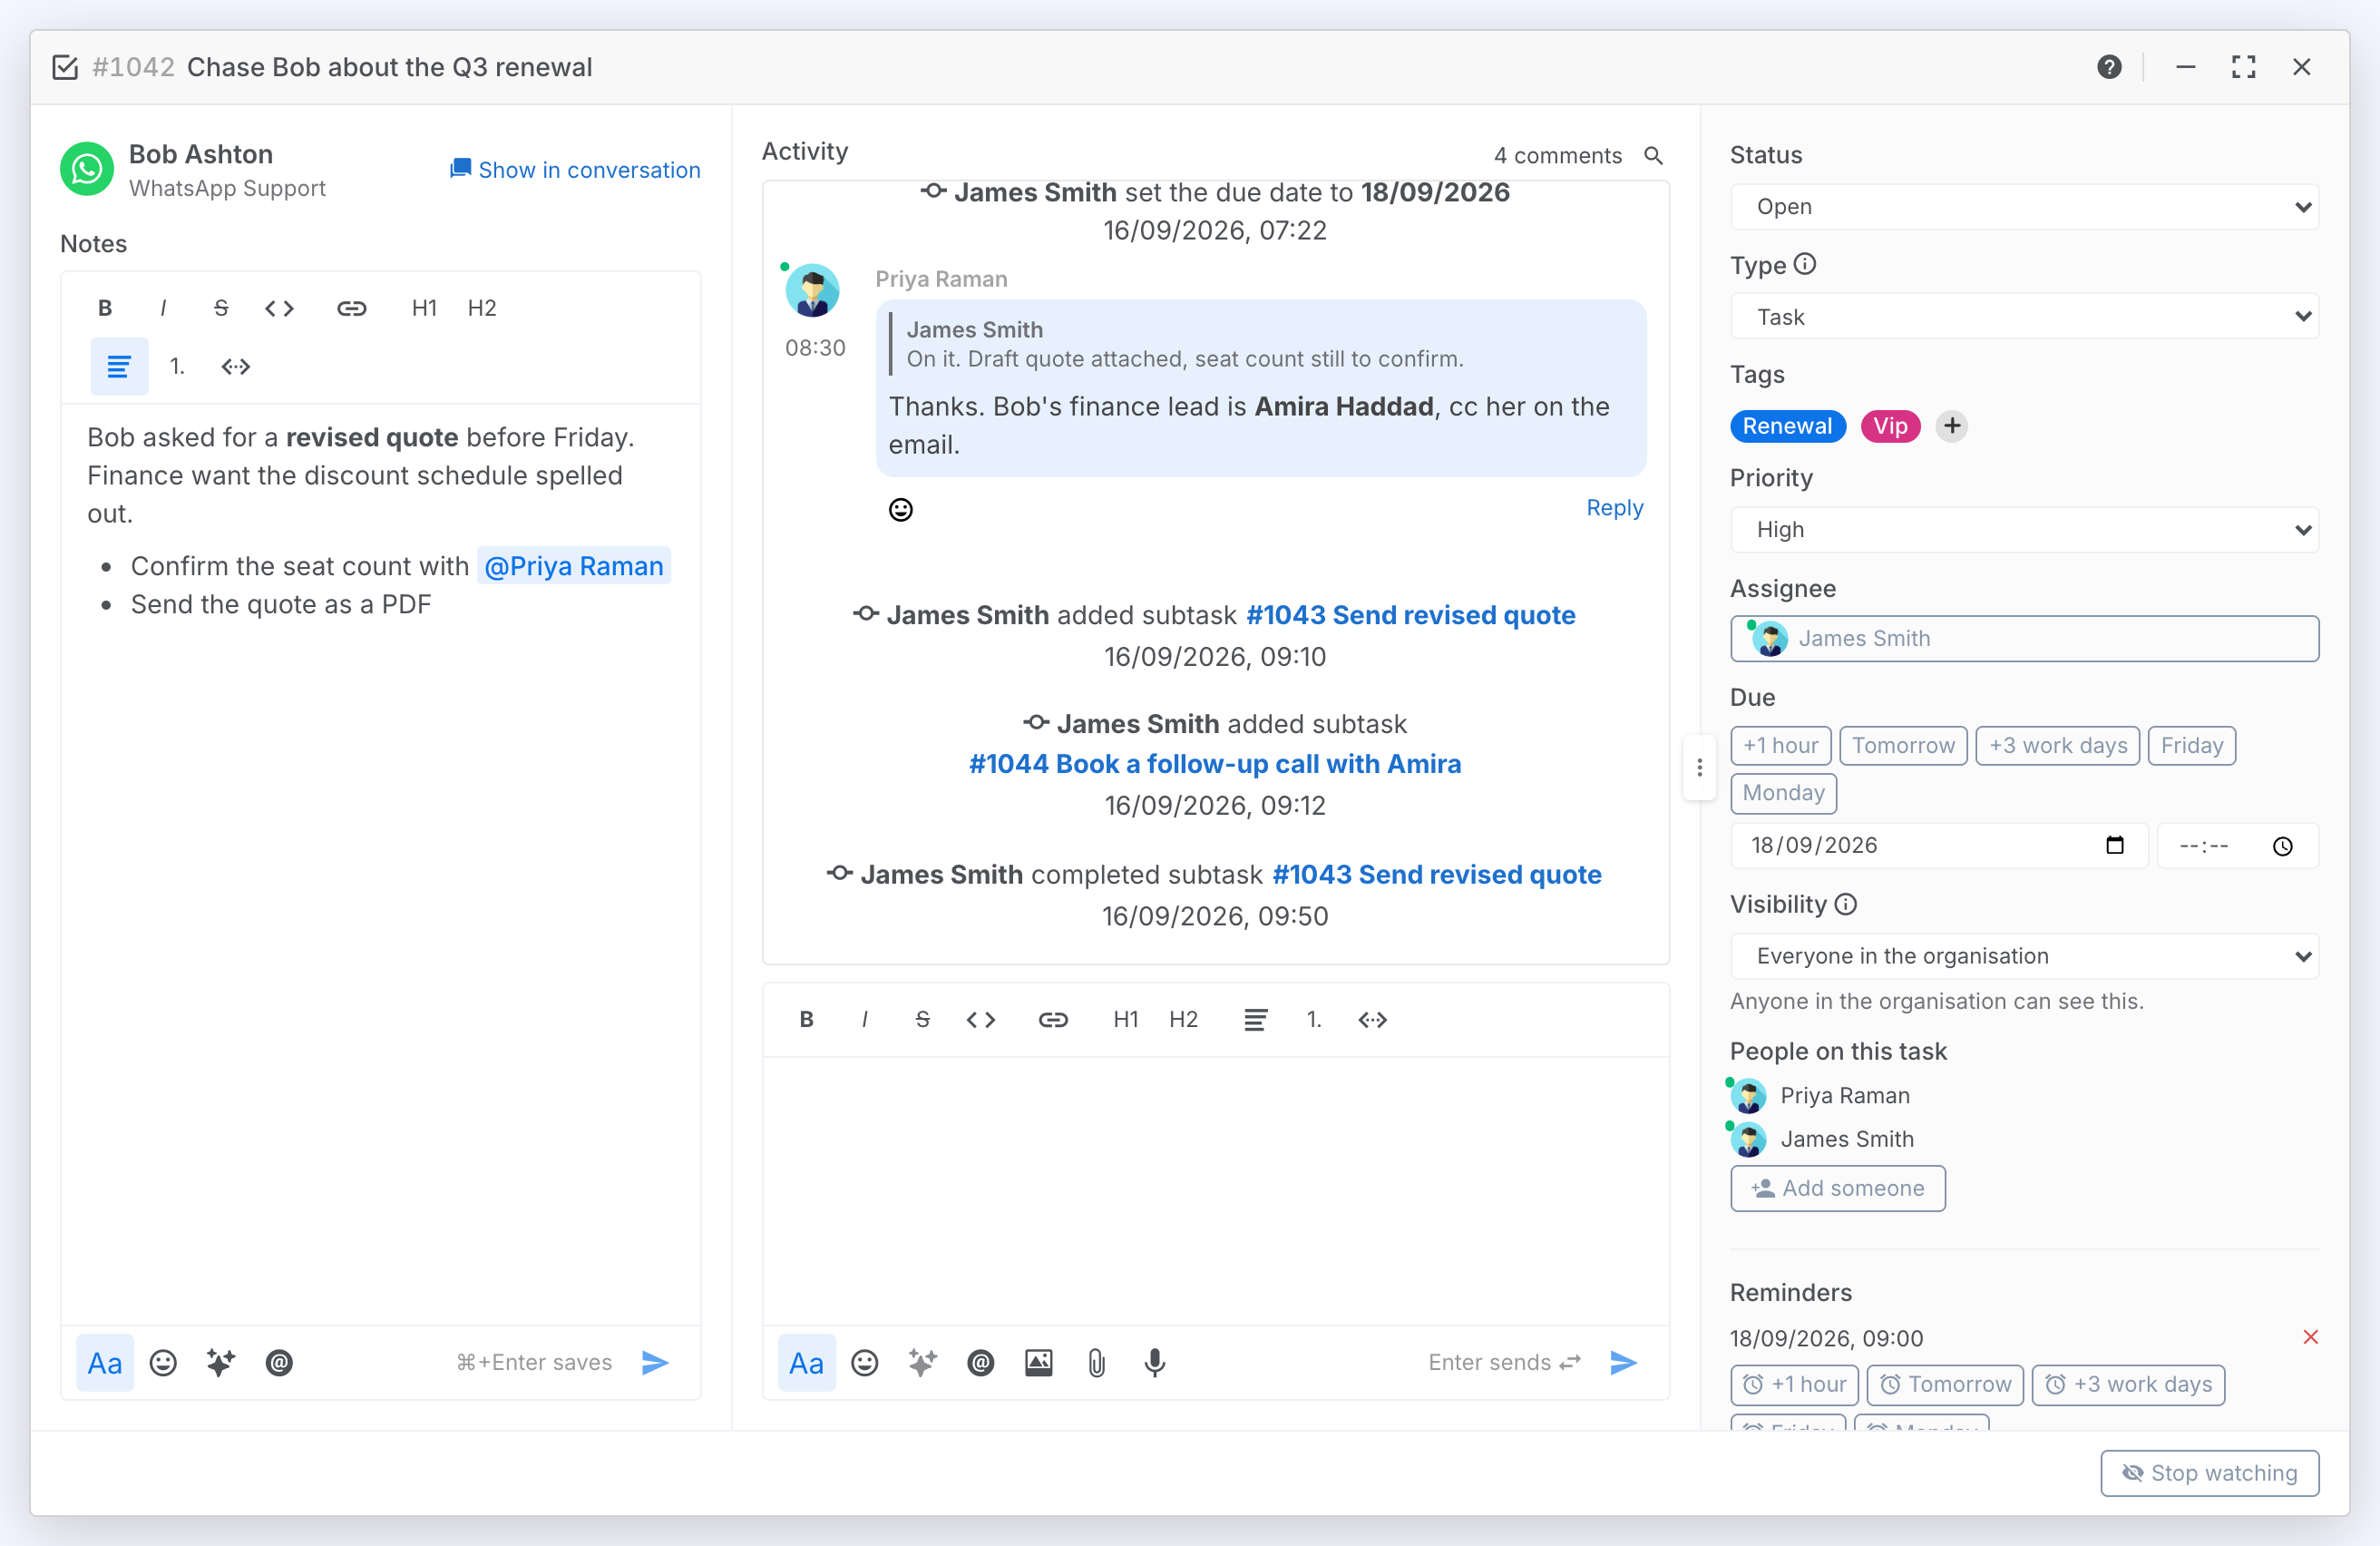
The task window is where you work a task or ticket: who it is about and your notes on the left, the activity thread with your colleagues in the middle, and every detail down the right: status, assignee, due date, reminders, visibility and subtasks. Several can be open at once. The same window is where a new task is created.
Interface Layout
- Title bar: the task's number and name. Click the name to rename it. The ? icon opens this article.
- Left pane: the user the task is about, with Show in conversation, and the Notes editor.
- Activity (centre): comments and the task's history, with the comment composer underneath.
- Details (right): status, type, tags, priority, assignee, due date, visibility, the people on the task, reminders, subtasks and blockers.
- Footer: a hint that tells you when something is saving, saved, unsaved or could not be sent, and the Watch button.
Who can editAnyone who can see a task can read it and comment on it. Changing its details, notes and subtasks is for the person who created it, the person it is assigned to, and supervisors. For everyone else those controls are shown but disabled. Features marked Permission Required depend on your role or your organisation's plan.
Around the Window
Three panes side by side. Drag the dividers between them to give the notes or the thread more room. The window remembers where you left them. On a phone the panes stack instead.
The footer hint is where the window talks to you. Saving… and Saved follow each change. Unsaved notes shows while the notes differ from what is stored. Not connected means a change could not be sent. Nothing is lost, so try again in a moment.
Open a Task
A task opens in its own window from anywhere it is mentioned.
Steps:
- Click a row on the Tasks page, a task card in a conversation, a result in search, or a notification about it.
- Or type its number, such as #1042, into the search box on the Tasks page.
Result: A task that is already open is brought to the front rather than opened twice. Opening from a notification about a comment lands the thread on that comment.
Rename a Task
The name in the title bar is also where it is changed.
Steps:
- Click the task's name in the title bar. If the window was behind another, the first click brings it forward. Click again to rename.
- Type the new name and press Enter. Esc cancels.
Create a Task
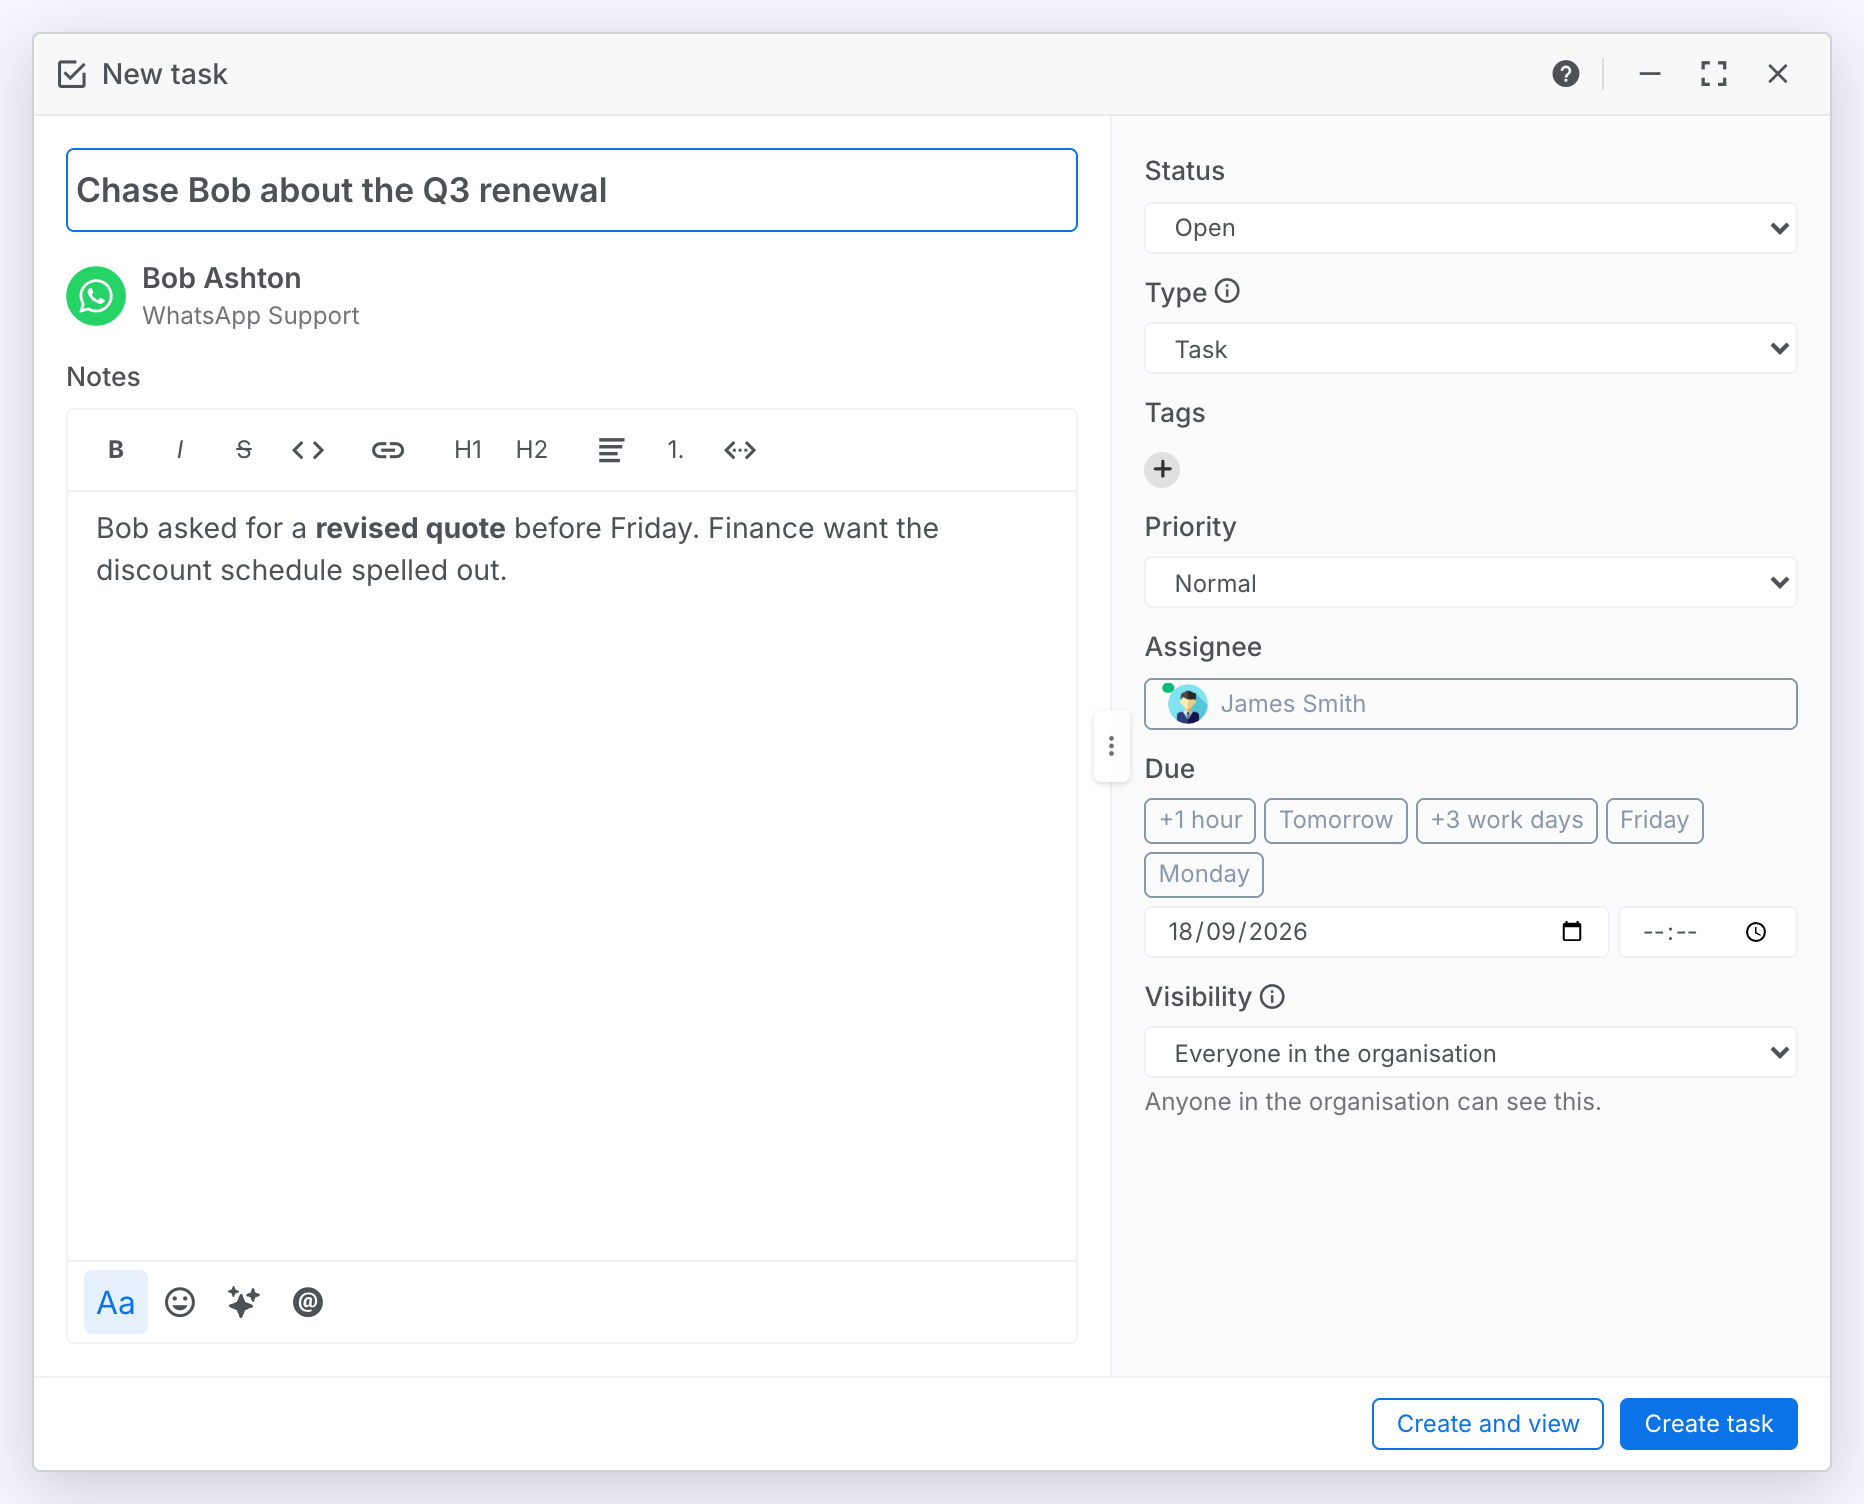
A new task uses the same window with the Activity pane hidden, because there is nothing to discuss yet. It opens from New task on the Tasks page, from a customer's message in a chat (see Tasks from a Conversation), from a user's card, or as a draft from the AI Task Assistant. Raised from a conversation, the title, the user, the due date and a reminder are filled in for you.
Only one New task window is open at a time. Clicking New task again brings the one you are writing to the front. AI drafts are the exception: each draft gets its own window, marked Drafted by AI from the conversation.
Create a Task or Ticket
Give it a title, set what matters, and create it.
Steps:
- Type the title in the What needs doing? field. It is the only thing required.
- Choose the Type. A Task is work for one person. A Ticket is a support request that can wait in a Business Unit's queue and carries a category. See Change the Type below.
- Add Notes. The full editor is available, with formatting and @mentions.
- Set the details on the right: priority, assignee (you, unless you choose someone else), due date, visibility and tags.
- Click Create task to create it and close the window, or Create and view to open the new task straight away.
Result: The task appears on the Tasks page and in the assignee's My tasks. If a reminder or quoted chat messages came with it, the reminder is set and the messages become the task's first comment.
Only If They Haven't Replied
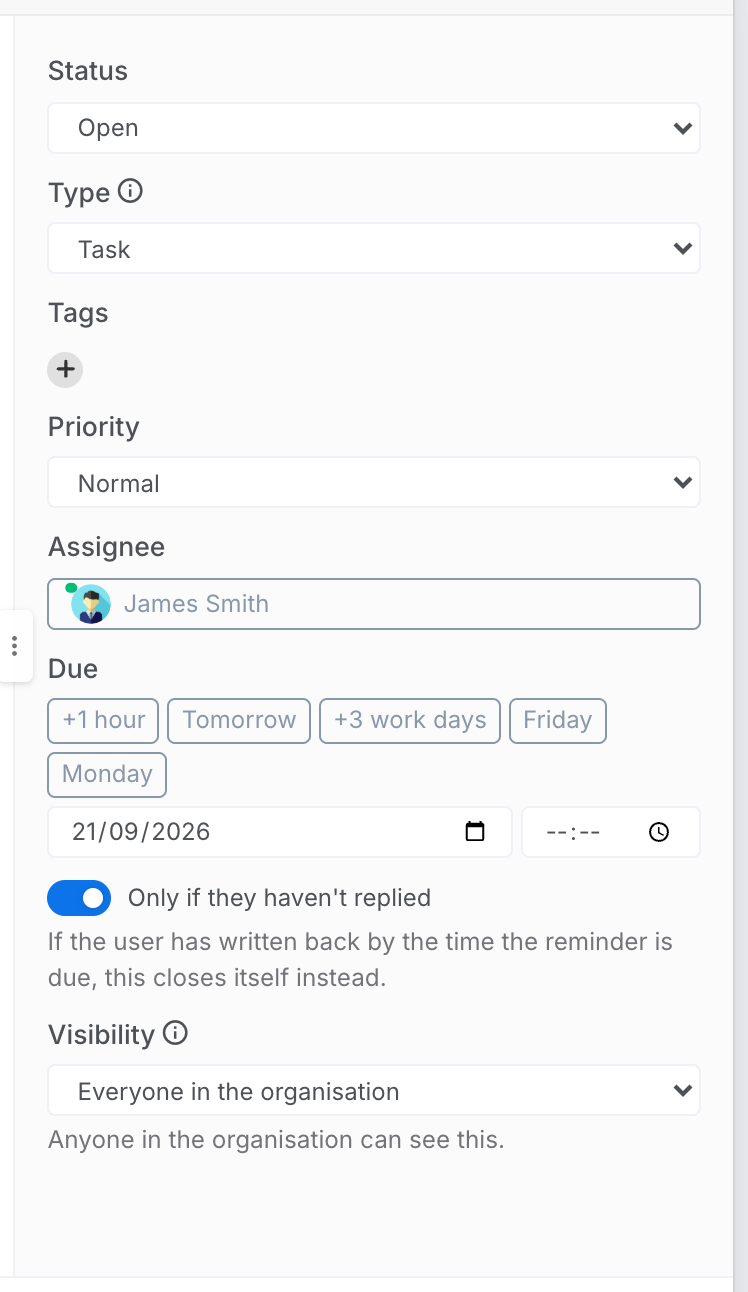
A follow-up raised from a customer's message offers a switch under the due date.
Steps:
- Raise a follow-up from a message (Follow up… in the message menu, then Custom…).
- Leave Only if they haven't replied on to have the task close itself if the user writes back before the reminder is due. Turn it off to keep the follow-up whatever happens.
Result: On the open task a line under Due says what will happen. Once the user has replied, it says when they did.
Task Details
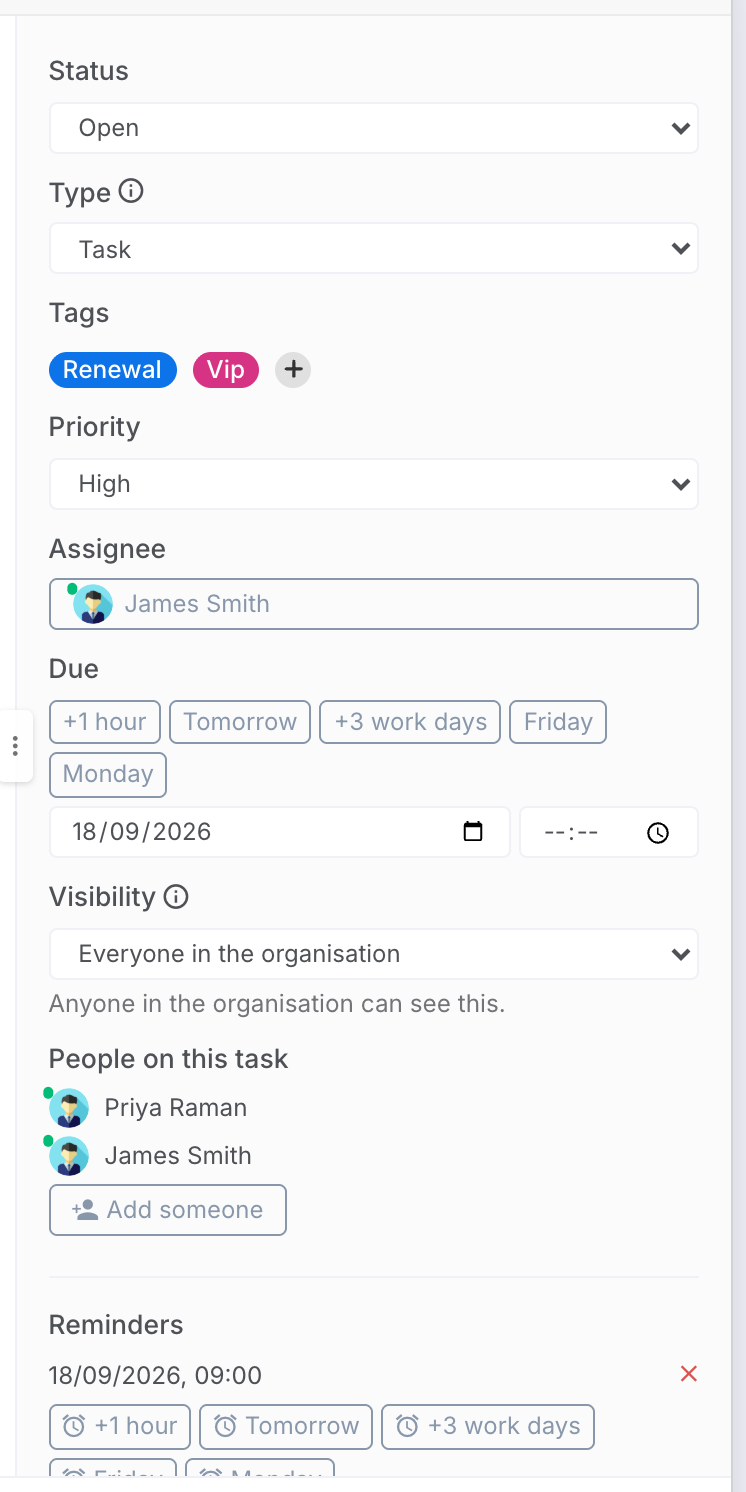
Every control in the rail saves as soon as you change it. The footer confirms with Saved. Colleagues with the task open see the change at once, and it is recorded in the Activity thread.
Change the Status
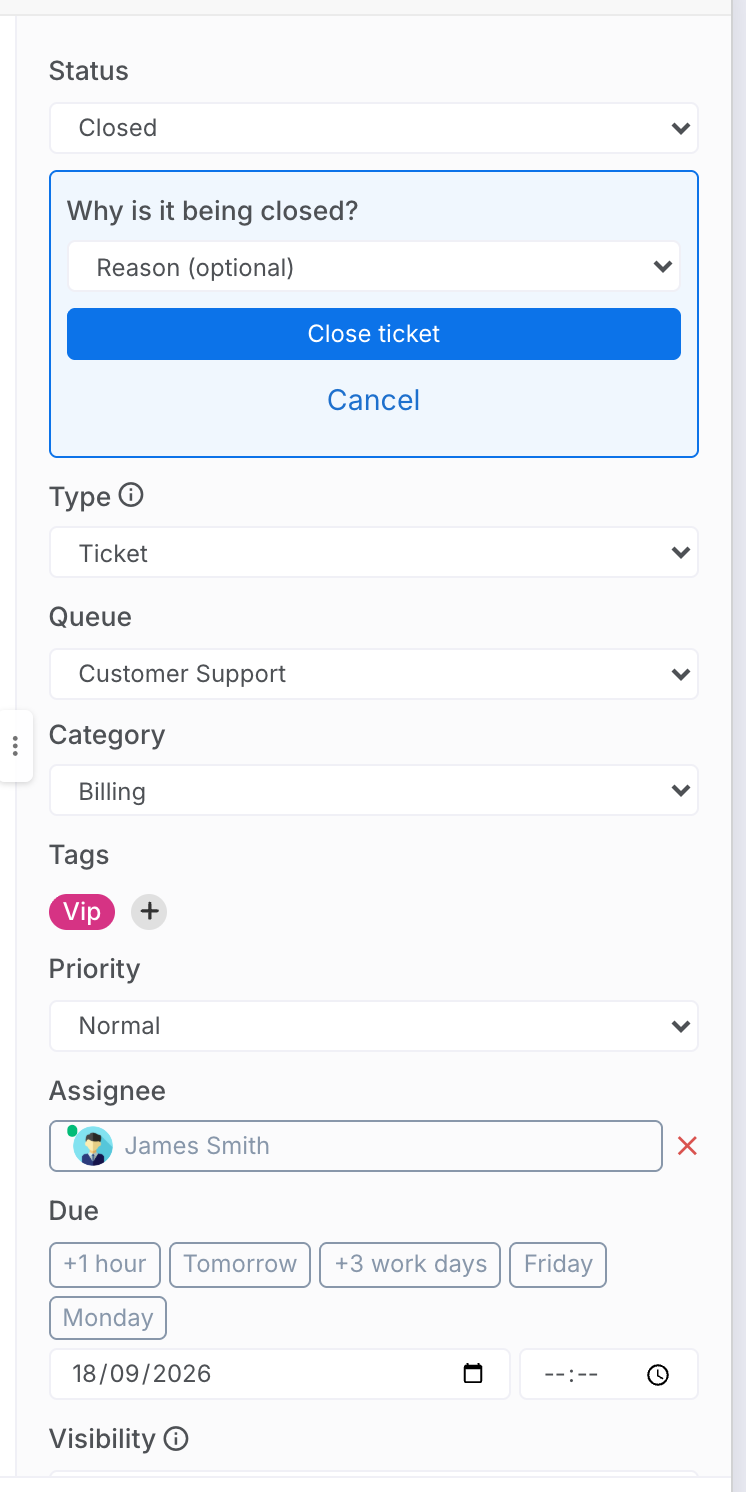
A task is Open or Done. A ticket has four statuses: Open, Waiting (parked on the customer), Resolved and Closed (finished without resolving it).
Steps:
- Pick the new status from the Status list.
- For Closed, choose a reason (Duplicate, Spam, No reply or Out of scope) and click Close ticket. Cancel puts the status back. The reason is optional and is recorded in the thread.
Result: A done or resolved task leaves My tasks. Set it back to Open to reopen it.
Assign the Task
Who is doing the work. A task always has an assignee. A ticket may instead wait in its queue for someone to claim it.
Steps:
- Click the Assignee button and choose a colleague from the picker.
- On a ticket in a queue, click the red × beside the assignee to take them off and leave the ticket for the queue. It then reads Unassigned (queue).
Result: The new assignee is notified and the task appears in their My tasks. Reminders belong to the assignee, so a queued ticket with nobody on it has none.
Set the Due Date
A due date can be a whole day or an exact time.
Steps:
- Click a quick chip: +1 hour, Tomorrow, +3 work days, Friday or Monday. Hover a chip to see the exact moment it means.
- Or pick a date, and optionally a time. Leave the time blank for a whole-day due date.
Add Reminders
A reminder reaches the assignee in the app and by email. A task can carry several.
Steps:
- Click a chip with the alarm icon to be reminded at that moment (the same choices as the due chips), or
- Choose an offset before the due date (10 minutes, 1 hour, 1 day or 1 week) and click Add. These move with the due date if it changes.
- Click the red × beside a reminder to remove it.
Result: Each reminder is listed with its time. Relative ones say their offset, and (sent) appears once it has fired. On a whole-day due date a relative reminder counts back from the assignee's morning hour, in their time zone.
Control Who Can See It
Visibility follows what the task is attached to, and can always be narrowed to the people on it.
Result: The line under the list says exactly who can see the task right now. People on this task lists them by name: the creator, the assignee, and everyone let in. Click Add someone to let a colleague in, or the × beside a name to take their access away. Mentioning someone in a comment adds them too. The mention picker says so before you send.
| Option | Who can see the task |
|---|---|
| Everyone in the organisation | Offered when the task is linked to a user or sits in a queue. Anyone in your organisation can open it. |
| Only people on this task, for now | Offered when the task is attached to nothing. Its creator, assignee and anyone added by name. A ticket becomes organisation-wide the moment it is put in a queue. |
| Private | Only the people on the task, whatever it is attached to, plus supervisors when it is linked to a user or a queue. |
Tag a Task
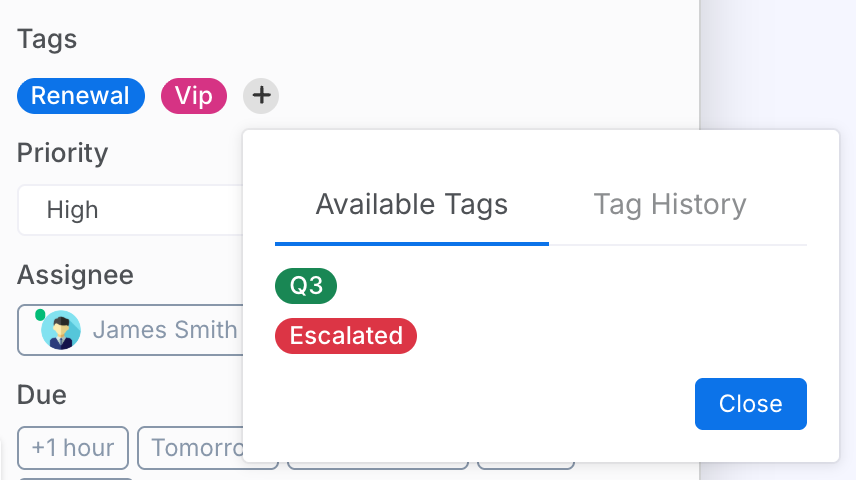
Tags group tasks across the Tasks page's filters. They use the same vocabulary as chat tags. Permission Required
Steps:
- Click the + under Tags.
- Click a tag under Available Tags to add it. Tag History shows who added and removed tags on this task.
- Click a tag on the task to remove it.
Change the Type
A task can become a ticket and back. The rail changes with it.
Steps:
- Choose Task or Ticket from the Type list.
Result: A ticket gains a Queue (one of your Business Units), a Category, the Waiting and Closed statuses and a close reason. Administrators see a Manage link beside Category that opens Ticket Categories.
Notes
The notes are the task's description: what it is about and anything the person doing it should know. They are written in the same editor as comments. The toolbar gives bold, italic, strikethrough, inline code, links, two heading sizes, bulleted and numbered lists, and code blocks. Aa hides the toolbar if you don't need it. The @ button, or typing @, mentions a colleague, and the smiley inserts an emoji.
Edit and Save the Notes
Unlike the details, notes are saved when you say so.
Steps:
- Edit the text. The footer reads Unsaved notes as soon as it differs from what is stored.
- Click the send button at the bottom right of the editor, or press ⌘+Enter (Ctrl+Enter on Windows).
Result: The notes are stored and the hint clears. Anyone you mentioned is added to the task and notified. If you close the window with unsaved notes, your draft is there again the next time you open the task.
Activity
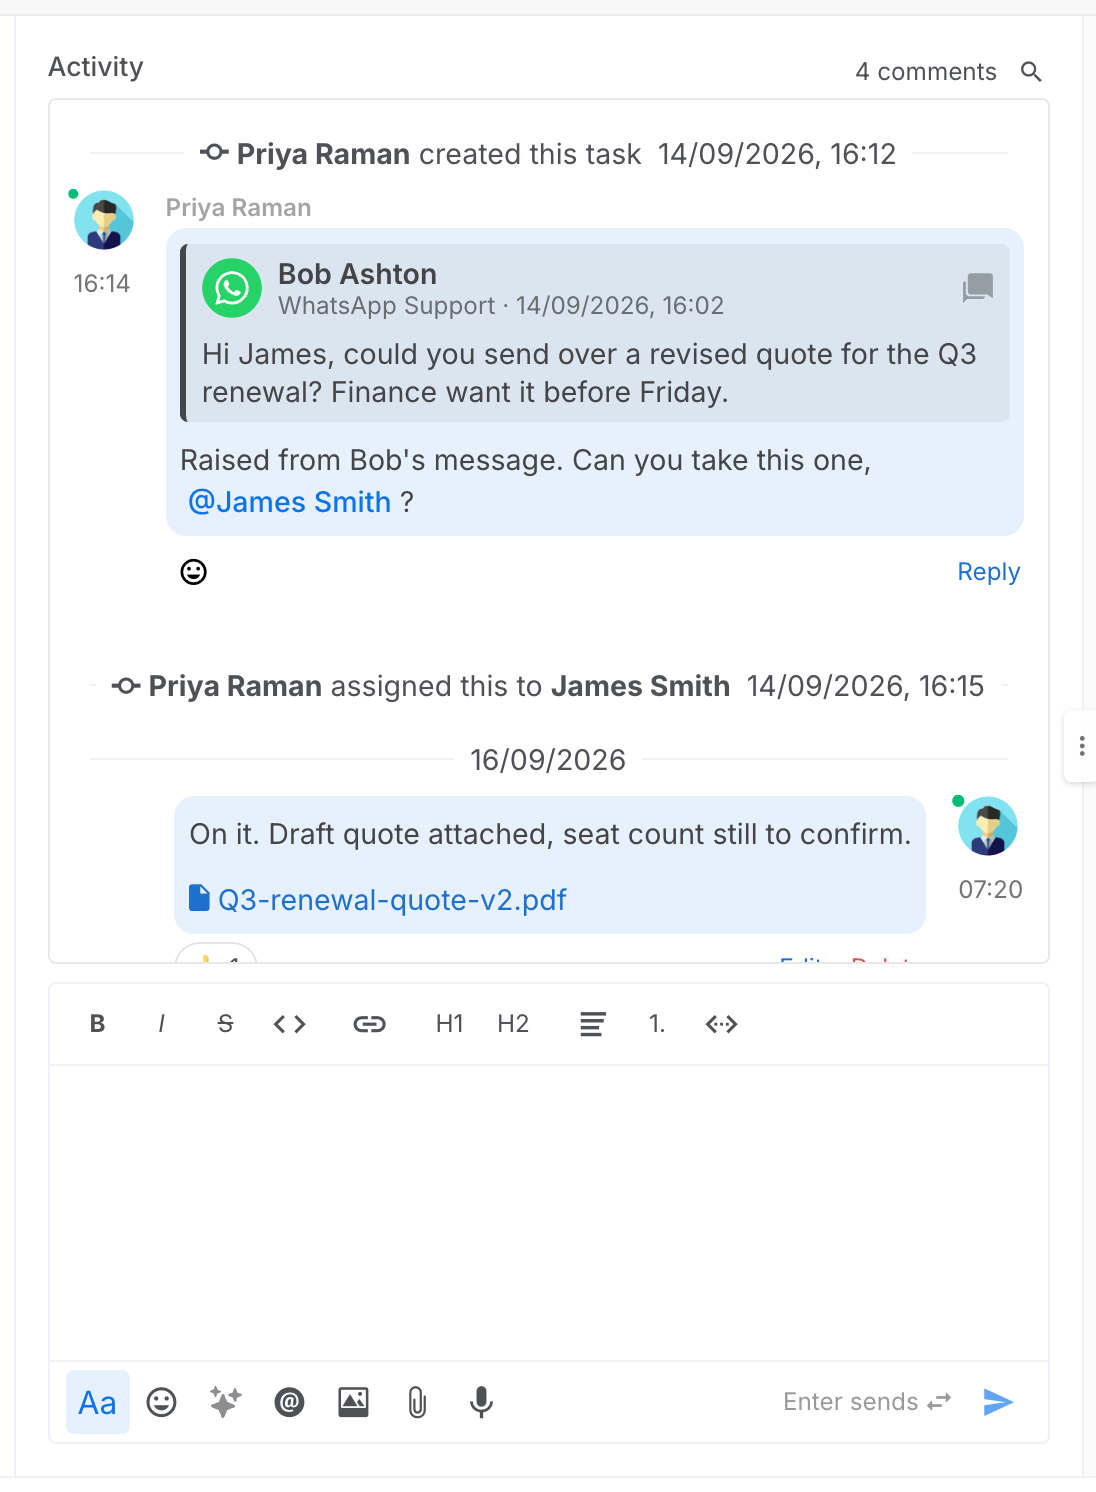
The thread holds the conversation about the task and its history in one place. Your colleagues' comments sit on the left and your own on the right. Between them is the system's record of what changed: created, assigned, status, due date, subtasks. The header shows who else has the task open, how many comments there are, and a magnifier to search them.
The thread opens at its newest entry. Scroll up for older ones. When you have scrolled up and something new arrives, a new comments pill appears. Click it to jump back to the end. A line above the composer shows who is typing.
Add a Comment
Write in the composer under the thread. Everyone watching the task is notified.
Steps:
- Type your comment. Enter sends and Shift+Enter adds a line. Click the hint in the footer to swap the two. On a touch screen Enter always adds a line.
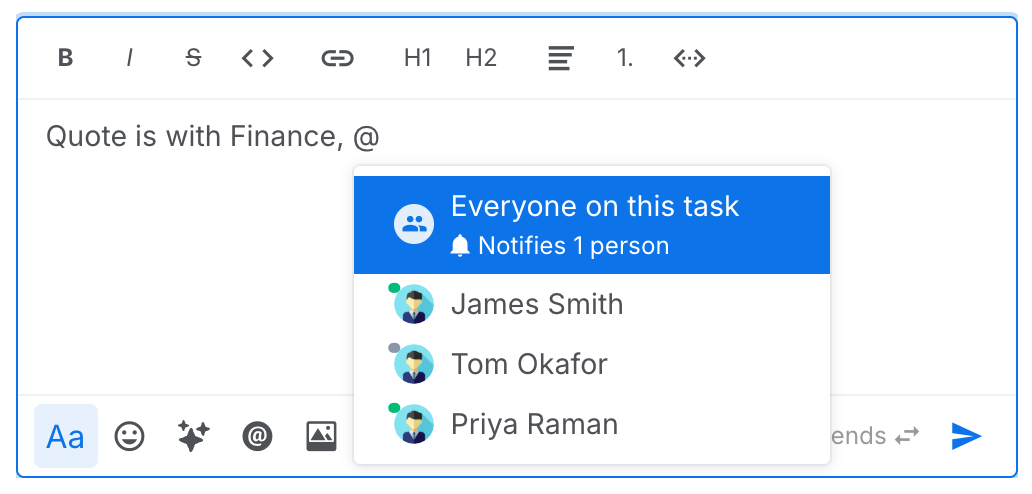
- Type @ and a name to mention a colleague. The picker tells you if they will be added to the task by the mention, or cannot see it and will not be notified. @everyone notifies everyone on the task.
- Attach a picture or a file with the image and paperclip buttons, or record a voice note with the microphone. One attachment per comment, with or without text.
Result: The comment appears at the end of the thread and the people on the task are notified. See Notifications.
- Drag a message out of a chat and drop it anywhere on the window to quote it in your comment.
- With the AI Writing Assistant permission, the sparkle button rewrites your draft before you send it.
Reply to a Comment
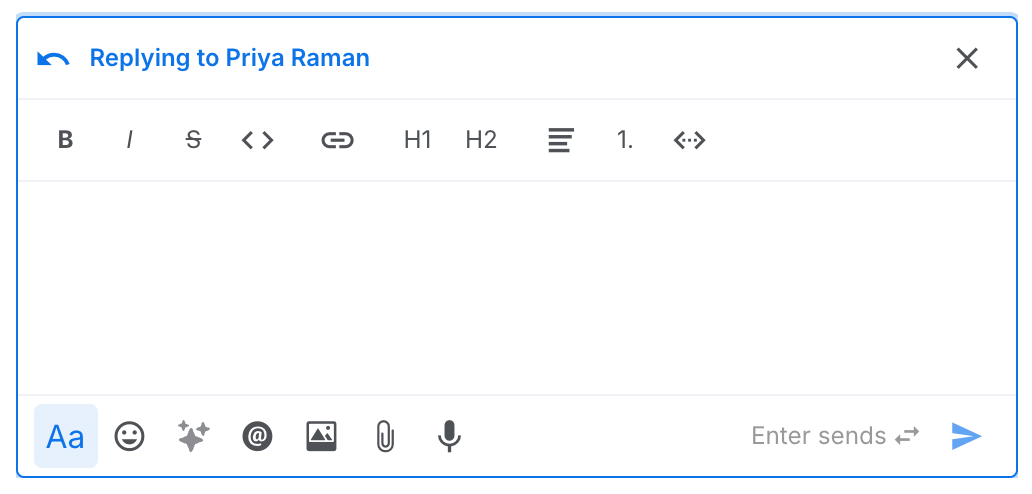
Quote a colleague's comment so the thread can see what you are answering.
Steps:
- Click Reply under the comment.
- Write your answer and send it. The × on the quote bar drops the quote and keeps your text.
Result: Your comment carries the quote. Clicking a quote in the thread jumps to the original comment, even if it has scrolled off. You cannot reply to your own comment.
React to a Comment
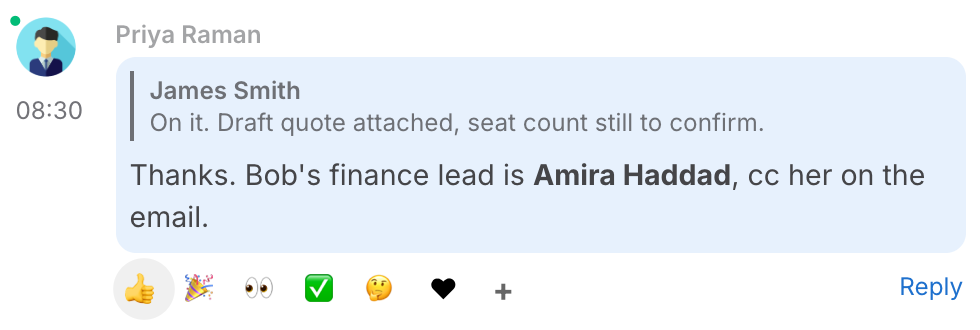
Acknowledge a comment without writing one. Reactions do not notify anyone.
Steps:
- Click the smiley under a colleague's comment and pick one of the six quick reactions, or + for the full emoji picker.
- Click a reaction chip to add yours to it, or click it again to take yours off.
Result: The chip shows the count, and lights up when yours is among them. On your own comments the reactions are shown but cannot be clicked.
Edit or Delete Your Comment
Your own comments carry Edit and Delete instead of Reply.
Steps:
- Click Edit. The text moves into the composer. Change it and send. The comment is marked (edited).
- Click Delete and confirm. The comment leaves the thread. Anything that quoted it shows Comment deleted in its place.
Search the Thread
Find a comment in a long thread.
Steps:
- Click the magnifier in the Activity header and type in the Search comments box.
- The matches drop down over the thread. Click one to jump to it, then use the arrows beside the box to step to the previous or next match.
- Esc hides the list but keeps the search. The magnifier closes it.
Quote Chat Messages
A comment can carry messages from the customer's conversation, shown as cards with the sender, channel and time.
Steps:
- From a chat, use Copy to task in the message menu, or drag the message onto the task window. Up to 20 messages can go in one comment.
- Add a caption if you want one and send.
Result: Clicking a quoted message's header opens the conversation at that message. A task raised from a message carries it as its first comment. See Tasks from a Conversation.
Subtasks and Blockers
Break a task into smaller ones, and record what it is waiting on. Both live at the bottom of the details rail.
Add a Subtask
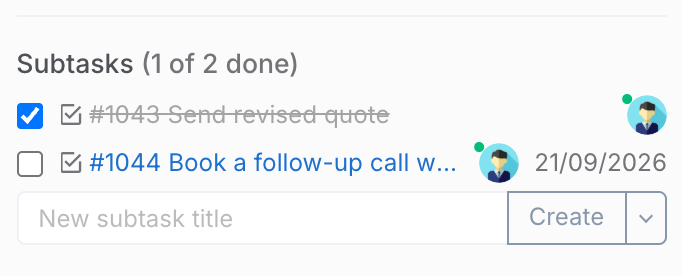
A subtask is a task of its own that belongs to this one.
Steps:
- Type a title under Subtasks and click Create, or press Enter.
- To make an existing task a subtask instead, open the arrow beside Create, choose Add an existing task by #, and enter its number.
Result: Each subtask is listed with a checkbox, its number and title, its assignee and due date. Tick the box to mark it done, or untick to reopen, if it is yours to edit. Click the title to open it. The count beside the heading shows how many are done, and +N more counts subtasks you cannot see.
Record a Blocker
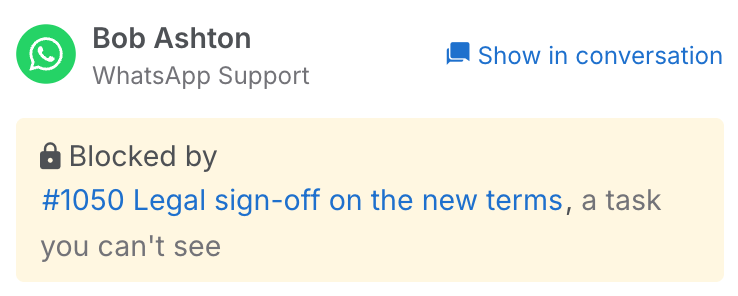
Say that another task has to finish before this one can.
Steps:
- Under Blocked by, enter the blocking task's number and click Add.
- Click the × beside a blocker when it no longer applies.
Result: A banner under the user's card names what the task is blocked by, and the rail lists it. Only open blockers are shown. Once the other task is done it stops blocking and drops off the list. A blocker you are not allowed to open appears as a task you can't see.
Watching
Watching a task means being notified about its comments and changes. The person who created a task and the person it is assigned to watch it automatically, and so does anyone who comments on it or is mentioned in it.
Watch or Stop Watching
The button at the bottom right of the window.
Steps:
- Click Watch to follow a task you are not on, or Stop watching to stop being notified about one you are.
Result: Tasks you watch but are not doing are listed under Watching on the Tasks page. Stopping is remembered: commenting again later does not put you back on the list. What you are notified about, and how, is described in Notifications.