Web Chat Identity Verification
Pass verified user identity from your website to the Convrs Web Chat widget using JSON Web Tokens (JWTs). This allows agents, chatbots, and AI to know exactly who they are talking to — without relying on the user to identify themselves.
When the chat widget runs on an authenticated page (such as a customer portal, banking dashboard, or account area), your backend already knows who the user is. JWT identity verification lets you securely pass that information to Convrs so it can be used throughout the conversation.
What this enables:
- Agents see verified customer details (name, account number, CRM link) without asking
- Chatbots can personalize responses and access user-specific data in flow logic
- AI has richer context for generating relevant answers
- Returning users are automatically reconnected to their chat history, even across devices or after clearing cookies
Flow State Is Not PreservedPassing a JWT does not resume a previous chatbot flow. Each new session starts the flow from the beginning, regardless of whether the user is identified via JWT. However, because the JWT payload is available to the flow, you can design your flows to use this data — for example, greeting the user by name or skipping steps where information is already known. See the User Data section below for details.
What is a JWT?
A JSON Web Token (JWT) is an industry-standard method for securely transmitting information between two systems. It is widely used by platforms such as Stripe, Auth0, Intercom, and Zendesk for identity verification.
How JWT Works
A JWT is a short string of text that contains a set of claims (data about the user) and a cryptographic signature that proves the data has not been tampered with.
A JWT has three parts separated by dots: header.payload.signature
- Header — identifies the token type and signing algorithm (always HS256 for Convrs)
- Payload — contains the user data (name, email, account number, etc.)
- Signature — a cryptographic hash that verifies the token was created by your server using your secret key
The token is generated by your backend server using a shared secret key that only your server and Convrs know. The user's browser carries the token but cannot read, modify, or forge it. When Convrs receives the token, it verifies the signature to confirm the data is authentic and has not been altered.
Without the signing secret, it is mathematically impossible to create a valid token. Even if someone intercepts a token in the browser, they cannot change the user's name, email, or any other field — any modification invalidates the signature. This is the same approach used by banks, payment processors, and identity providers worldwide.
Setup Overview
Setting up JWT identity verification involves three steps: generating a signing secret in Convrs, creating tokens on your backend, and adding a single line of JavaScript to your page.
Step 1 — Generate a Signing Secret
Create a signing secret in the Convrs administration panel. This secret is shared between your backend and Convrs.
Steps:
- Navigate to Administration > Organization Settings > Developer - WebChat.
- Click Generate Secret.
- Copy the secret and store it securely on your server (e.g. in an environment variable). This is the only time the full secret is shown.
Step 2 — Generate a JWT on Your Backend
When a user logs into your site, generate a JWT containing their identity information. This should be done server-side, never in the browser.
Use an established JWT library for your programming language. We recommend:
- Node.js —
jsonwebtoken(maintained by Auth0) - Python —
PyJWT - PHP —
firebase/php-jwt - Java —
io.jsonwebtoken / jjwt - Ruby —
ruby-jwt
Node.js example:
const jwt = require('jsonwebtoken');

const token = jwt.sign(
  {
    userId: 'user-12345',
    email: 'jane@example.com',
    name: 'Jane Doe',
  },
  process.env.CONVRS_SIGNING_SECRET,
  { algorithm: 'HS256', expiresIn: '1h' }
);
Python example:
import jwt, time, os

token = jwt.encode(
    {
        "userId": "user-12345",
        "email": "jane@example.com",
        "name": "Jane Doe",
        "exp": int(time.time()) + 3600,
    },
    os.environ["CONVRS_SIGNING_SECRET"],
    algorithm="HS256",
)Always set an expiry time (exp) on your tokens. We recommend 1 hour. The token is read when the chat widget connects, so a short-lived token limits the window for replay if intercepted. Generate the token once at login and reuse it across page loads within its lifetime.
Step 3 — Add the Token to Your Page
Pass the token to the chat widget by setting a global JavaScript variable on your page. This can appear anywhere — before or after the widget script tag.
var ConvrsUser = "your.jwt.string";
Pages containing the JWT token must not be cached by CDNs or edge servers. Set Cache-Control: private on any page that includes the token to prevent one user's identity from being served to another.
Steps:
- Set a global JavaScript variable called
ConvrsUsercontaining the token string. Output this from your backend template into a script tag anywhere on the page.
<!-- Your existing Convrs webchat embed -->
<script defer id="convrs-webchat"
  src="https://webchat.conv.rs/YOUR_WIDGET_ID.js">
</script>

<!-- Add this anywhere on the page -->
<script>var ConvrsUser = "eyJhbGciOi...";</script>
The widget reads ConvrsUser when it opens the WebSocket connection. If the variable is not set, the widget operates normally without identity verification.
JWT Payload Fields
The JWT payload contains the data you want to pass to Convrs. Fields are divided into identity fields, automation data, and agent display data.
Identity Fields
These fields identify the user and update their contact record in Convrs.
userId field creates a permanent mapping between your user and their Convrs identity. If a user clears their cookies or switches devices, the userId ensures they are reconnected to the same conversation history. Use a stable ID (database primary key, UUID) — not an email address, which may change.
| Field | Type | Required | Description |
|---|---|---|---|
userId | String | Recommended | A stable, unique identifier for the user in your system (e.g. database ID, UUID). Used to permanently link the user to their Convrs chat history across devices and sessions. Without this, returning users who clear cookies will appear as new visitors. |
email | String | No | The user's email address. Must be a valid email format — invalid addresses are silently ignored. |
name | String | No | The user's display name. Replaces the randomly generated name assigned to anonymous visitors. Automatically split into first and last name for the agent's contact panel. |
phone | String | No | Phone number in international format (e.g. +447700900123). |
locale | String | No | Language/locale code (e.g. en-GB, fr-FR). Sets the user's language preference for the conversation. |
crmID | String | No | An identifier that links the user to a record in your CRM system. Displayed to agents alongside a link if a CRM integration is configured. |
User Data (userData)
The userData object passes custom data that is available to chatbot flows and logic blocks. This allows your chatbot to personalize responses and make decisions based on information from your system — without needing API calls during the conversation.
{
  "userData": {
    "accountNumber": "AC-12345",
    "plan": "enterprise",
    "vipTier": "gold",
    "companyName": "Acme Corporation",
    "activeSince": "2023-01-15"
  }
}
userData is a freeform key-value object — you control the keys and values. There is no fixed schema. Values can be strings, numbers, or booleans.
How it works with flows:
- Data is stored on the user's record and merged with any existing
userData(top-level keys are updated; keys not present in the JWT are left unchanged) - In the Flow Builder, access values using logic blocks with the syntax
{{userData.accountNumber}} - Use conditions like
userData.plan == "enterprise"to branch conversation flows - The data is available immediately — no API calls or integrations required
Because each new session starts the flow from the beginning, design your flows to take advantage of JWT data from the first message:
- Greet returning users by name: "Hi {{name}}, how can we help today?"
- Route VIP customers to a priority queue based on
userData.vipTier - Greet the user by company name: "Welcome, {{userData.companyName}}!"
- Skip identity verification steps if
userData.accountNumberis already set - Show different product options based on
userData.plan
userData. While the JWT is signed, the payload is base64-encoded and can be read by anyone with access to the browser.
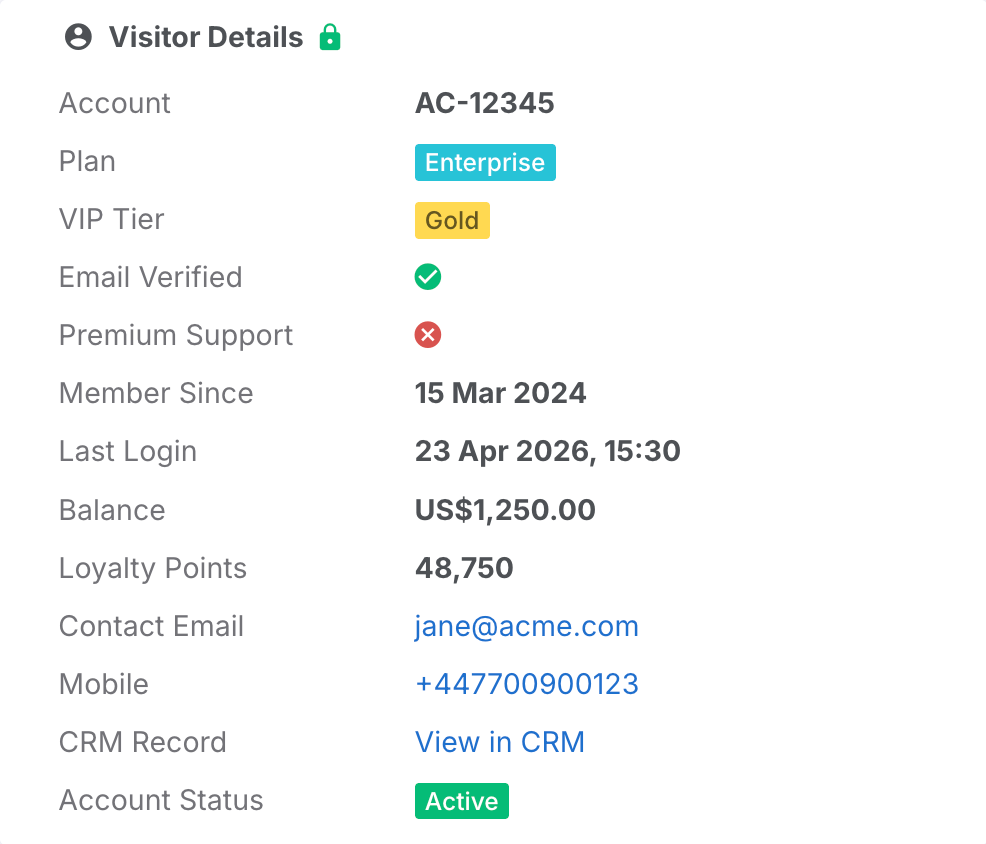
Agent Display Data (agentData)
The agentData array defines information displayed to agents in the user panel during a live chat. Unlike userData (which is for chatbot automation), agentData is specifically designed for human agents and supports rich formatting.
Each item in the array is an object with a label (what the agent sees as the field name) and a value (the data). Items are displayed in the order they appear in the array, giving you full control over the layout.
{
  "agentData": [
    { "label": "Account",      "value": "AC-12345" },
    { "label": "Plan",         "value": "Enterprise", "type": "status", "color": "info" },
    { "label": "VIP Tier",     "value": "Gold",       "type": "status", "color": "warning" },
    { "label": "Verified",     "value": true,         "type": "boolean" },
    { "label": "Member Since", "value": "2024-03-15", "type": "date" },
    { "label": "Last Login",   "value": "2026-04-23T14:30:00Z", "type": "datetime" },
    { "label": "Balance",      "value": 1250.00,      "type": "currency", "currency": "USD" },
    { "label": "Points",       "value": 48750,        "type": "number" },
    { "label": "Email",        "value": "jane@example.com", "type": "email" },
    { "label": "Mobile",       "value": "+447700900123",     "type": "phone" },
    { "label": "CRM Record",   "value": "https://crm.example.com/12345", "type": "link", "text": "View in CRM" }
  ]
}
Agents see this data in a Visitor Details card in the user panel, with a lock icon indicating the data has been verified and can be trusted.
| Field | Required | Description |
|---|---|---|
label | Yes | The field name displayed to the agent (e.g. "Account Number", "Plan") |
value | Yes | The data value — can be a string, number, or boolean depending on the type |
type | No | Formatting type (see table below). Defaults to plain text if omitted. |
Supported Display Types
The type field controls how the value is formatted for the agent. If omitted, the value is displayed as plain text.
| Type | Value Format | Renders As | Additional Fields |
|---|---|---|---|
| (default) | String | Bold text | — |
date | Date string (e.g. 2024-03-15) | Formatted date in the agent's locale (e.g. "15 Mar 2024") | — |
datetime | ISO 8601 string (e.g. 2026-04-23T14:30:00Z) | Formatted date and time in the agent's locale (e.g. "23 Apr 2026, 14:30") | — |
number | Number | Locale-formatted number with thousand separators (e.g. "48,750") | — |
currency | Number | Currency-formatted number (e.g. "$1,250.00") | currency — ISO 4217 code (e.g. USD, GBP, EUR) |
email | String | Clickable email link | — |
phone | String | Clickable phone link | — |
link | URL string | Clickable link (opens in new tab) | text — display text shown instead of the URL (e.g. "View in CRM") |
boolean | true or false | Green checkmark or red cross icon | — |
status | String | Coloured badge/pill | color — one of: success (green), danger (red), warning (yellow), info (blue), primary (default blue), secondary (grey) |
Full Example
A complete example showing all available fields in a single JWT payload.
Complete JWT Payload
This example includes identity fields, automation data, and agent display data.
{
  "userId": "user-12345",
  "email": "jane@example.com",
  "name": "Jane Doe",
  "phone": "+447700900123",
  "locale": "en-GB",
  "crmID": "CRM-56789",

  "userData": {
    "accountNumber": "AC-12345",
    "plan": "enterprise",
    "vipTier": "gold"
  },

  "agentData": [
    { "label": "Account",      "value": "AC-12345" },
    { "label": "Plan",         "value": "Enterprise", "type": "status", "color": "info" },
    { "label": "VIP Tier",     "value": "Gold",       "type": "status", "color": "warning" },
    { "label": "Verified",     "value": true,         "type": "boolean" },
    { "label": "Balance",      "value": 1250.00,      "type": "currency", "currency": "USD" },
    { "label": "CRM Record",   "value": "https://crm.example.com/12345", "type": "link", "text": "View in CRM" }
  ]
}
Node.js — generating and outputting the token:
// Server-side (e.g. Express route handler)
const jwt = require('jsonwebtoken');

app.get('/dashboard', (req, res) => {
  const user = req.session.user; // your authenticated user

  const convrsToken = jwt.sign(
    {
      userId: user.id,
      email: user.email,
      name: user.fullName,
      userData: {
        accountNumber: user.accountNumber,
        plan: user.plan,
      },
      agentData: [
        { label: 'Account', value: user.accountNumber },
        { label: 'Plan',    value: user.plan, type: 'status', color: 'info' },
      ],
    },
    process.env.CONVRS_SIGNING_SECRET,
    { algorithm: 'HS256', expiresIn: '1h' }
  );

  res.render('dashboard', { convrsToken });
});
HTML template output:
<script>var ConvrsUser = "{{convrsToken}}";</script>
<script defer id="convrs-webchat"
  src="https://webchat.conv.rs/YOUR_WIDGET_ID.js">
</script>
Best Practices
Follow these recommendations for a secure and reliable integration.
Security
Recommendations for keeping your integration secure.
- Always use HS256 — this is the only signing algorithm accepted by Convrs
- Set an expiry — use
expiresIn: '1h'(or theexpclaim) to limit the token's lifetime - Generate tokens server-side only — never expose the signing secret in client-side code
- Store the secret securely — use environment variables, not configuration files committed to source control
- Rotate secrets if compromised — use the Rotate Secret feature in the Developer - WebChat panel, which provides a 48-hour grace period for the previous secret
- Do not cache pages with tokens — set
Cache-Control: privateto prevent CDNs from serving one user's token to another
Token Lifecycle
How to manage token generation and refresh.
- Generate once at login — create the token when the user authenticates and store it in the server-side session
- Reuse across page loads — output the same token on each page within its lifetime, rather than generating a new one per page
- Refresh before expiry — if using a single-page application, regenerate the token at 75% of its lifetime (e.g. after 45 minutes for a 1-hour token)
- For SPAs and static sites — expose a
/api/chat-tokenendpoint that returns a fresh token, and call it when the page loads
Testing
Use the built-in token verification tool to test your integration before going live.
Steps:
- Navigate to Administration > Organization Settings > Developer - WebChat.
- Paste your JWT token into the Test a JWT Token field.
- Click Verify Token.
- If valid, you will see the decoded payload with all the fields. If invalid, you will see the specific error (expired, invalid signature, etc.).